Friday, January 30, 2009

Alexander Chesney's Rivulet

[Minor edits 12/28/09]

One of the few British accounts of the battle of Cowpens was provided by the Loyalist Alexander Chesney. In his Journal, he wrote:

"I rode to my father's who said Morgan was gone to the Old-fields about an hour before; my wife said the same and that they had used or destroyed my crop & took away almost every thing. I immediately returned to Col Tarleton and found he had marched towards the Old fields. I overtook them before 10 oclock near the Cowpens on Thickety Creek where we suffered a total defeat by some dreadful bad management. The Americans were posted behind a rivulet with Rifle-men as a front line and Cavarly in the rear so as to make a third line; Col Tarleton charged at the head of his Regiment of Cavalry called the British Legion which was filled up from the prisoners taken at the battle of Camden; the Cavalry supported by a detachment of the 71st Regt under Major McArthur broke the Riflemen without difficulty, but the prisoners on seeing their own Regt opposed to them in the rear would not proceed against it and broke: the remainder charged but were repulsed this gave time to the front line to rally and form in the rear of their Cavalry which immediately charged and broke the 71st (then unsupported) making many prisoners: the rout was almost total. I was with Tarleton in the charge who behaved bravely but imprudently the consequence was his force disperced in all directions the guns and many prisoners fell into the hands of the Americans."

A curious feature of this account is the statement that, "The Americans were posted behind a rivulet," that is a small stream. An examination of the battlefield shows that there is no such stream interposing between the American and British initial positions. Chesney's account suggests that during the battle he was on the left side of the British line, and more specifically, with Tarleton's dragoon reserve. Lawrence Babits in A Devil of a Whipping pointed out that there is an area of low ground near the Green River Road on the left side of the battlefield, and he suggested that "After winter rains, this low ground was probably a near bog at the time of the battle" (p 63). Boggy ground and a small stream would not seem to be the same thing, but Babits' suggestion is nevertheless appealing. Chesney is considered to be a reliable source, and an explanation along these lines seems preferable to ignoring his statement. Given all the tumult, the large numbers of men about him, and perhaps also that his group was moving with some speed, it's not unreasonable that Chesney's remembrance would be less than perfect. Also possible is that the terrain has changed somewhat since the time of the battlefield.

The American Deployment at Cowpens. "Rivulets" exist on the flanks of the American army, but not in front. 1 = Continental Light Dragoons, 2 = Mounted Militia, 3 = Right Wing of the Main Line, 4 = Continental Infantry, 5 = Left Wing of the Main Line, 6 = Right Wing of the Militia Line, 7 = Left Wing of the Militia Line, 8 = Skirmishers.

Possible Location of Alexander's Chesney's Rivulet. The medium blue line in the bottom half of the map shows the approximate path of Chesney's rivulet, as based on Babits' maps and erosion patterns visible in the topography. (Contour lines are at 20-foot intervals; a more detailed topographic map may suggest a different path).

Chesney indicated that the Americans were posted behind this rivulet. Technically, the map shows this, but Chesney's account implies that the Americans would have been closer to this terrain feature than the map indicates. However, it is again plausible that Chesney was in error and his statement about the Americans being formed behind this barrier may have been no more than supposition on his part. Chesney's statement that he met up with the British "before 10 oclock" may mean that he may have missed the beginning of the battle, as other accounts place the start of the battle considerably earlier (e.g., "about sunrise," according to Brigadier-General Daniel Morgan, and "before one hour of daylight had passed," according to Lieutenant Roderick Mackenzie). In any case, no American account mentions this rivulet and from this it can be inferred that it did not play a role in the Americans' defensive plans.

Babits took Chesney's statement fairly literally. Specifically, he placed the American skirmish line a little more than 100 yards behind the rivulet. This too may seem to be stretching the definition of "behind," but at least the advancing British would have been well within the range of the Americans' rifles at that juncture.

In my view, this interpretation causes two problems.

First, this interpretation does not wholly jibe with Chesney's statement. Chesney did not describe the existence of a separate American skirmish line. His "riflemen" is the American militia line (the regulars, which are not mentioned, are the second line and the "Cavarly in the rear" are explicitly called "a third line"). All writers agree that the militia line was not posted in the supposed vicinity of Chesney's rivulet.

Second, participant accounts indicate that the main line, the militia line, and the skirmishers were spaced at 150 yard intervals (some put the distance at 200 yards). If the skirmishers were near the rivulet, then the militia and main lines must be placed in advance of the positions usually ascribed to them.

Sources:

The Journal of Alexander Chesney.

Lawrence Babits' A Devil of a Whipping: The Battle of Cowpens is available through amazon.com

John Moncure's online history of the battle, The Cowpens Staff Ride and Battlefield Tour, includes a transcription of the statements by Morgan, and Mackenzie.

Tuesday, January 27, 2009

71st Regiment of Foot

[Minor edits 12/28/09]

The 71st Regiment of Foot was raised in 1775 among the Highlanders of Scotland; it was the first British regiment to be raised after the start of the war. At its peak, the regiment had 2,340 men. The regiment was sent to New York in 1776 and participated in the battle of Long Island, and served in a minor capacity at White Plains and Fort Washington. The following spring (1777), the regiment was active in New Jersey and fought at Short Hills; that summer, the 71st accompanied William Howe to Pennsylvania, where it fought at Brandywine. Afterwards, the regiment was used to guard the British baggage and to help secure the Delaware River. The regiment returned to New York in December, 1777. While in New York, the 71st participated in the raid on Little Egg Harbor, New Jersey (1778), and the grenadiers of the regiment were captured at Stony Point (1779). The 71st participated in the capture of Savannah (1778), and Augusta (1779) in Georgia. In that same campaign it served with distinction at Briar Creek, Stono Ferry, and the siege of Savannah (1779). The following year (1780), the 71st participated in the siege of Charleston and was garrisoned at Cheraws, South Carolina, when the British established a system of outposts in that state.

The 71st suffered significant losses in 1779-1780 due to illness. Captain Johann Ewald of the Hessian Jaegers recorded in his diary (February 2, 1780) that "The remainder of the 71st Scottish Regiment, which had arrived from Savannah, joined us here [near Charleston]. The regiment had melted away during this war from three thousand to four hundred men, due partly to the sword and partly to the climate."

The 71st was placed in reserve at Camden (1780), and helped repel the Continentals when the British left began to gave way. Subsequently, the regiment participated in Cornwallis' abortive invasion of North Carolina, and was present at the capture of Charlotte (1780). The 1st battalion of the 71st and the light infantry of both battalions were destroyed at Cowpens. The 2nd battalion fought at Wetzell's Mill and Guilford Courthouse (1781), and was captured at Yorktown (1781).

The images below show my 1st battalion of the 71st advancing into action. The uniform is based on the Troiani painting of an infantryman of the 71st in the South. Among the miniatures is a bagpiper (wearing a enlisted man's coat with some lace added to the shoulders rather than a proper musician's uniform). Colonel Otho Williams mentioned in a letter that the bagpipes of the 71st were captured at Cowpens.


Feud with Tarleton

Immediately after Cowpens, a long-running feud began between Tarleton and the officers of the 71st. Lieutenant-Colonel John Eager Howard of the Maryland continentals recalled that the captured, "Major M'Arthur [of the 71st] very freely entered. into conversation, and said that he was an officer before Tarleton was born; that the best troops in the service were put under 'that boy' to be sacrificed." Brigadier-General William Moultrie of South Carolina heard the paroled British officers echoing these sentiments after their arrival in Charleston, where they awaited to be exchanged for American prisoners of war. He recalled, "Some of the old British officers who were made prisoners, and paroled to Charlestown, when they came down, were exceedingly angry indeed, at their defeat, and were heard to say, 'that was the consequence of trusting such a command to a boy like Tarleton.'" David Stewart's 1822 Sketches... of the Highlanders of Scotland related that, "if they [the 71st] had been properly led on and supported, they would have shown themselves at Cowpens the same as in all other actions... The troops were hurried into action, without any previous examination of the ground, or of the disposition of the enemy; and so strong was the impression on the minds of the officers of the Highland regiment that the fault did not lie with their men, that they made a representation to Lord Cornwallis, not to be employed again under the same officer. His Lordship complied with their request." The feud reached its climax with the attacks of Lieutenant Roderick's Mackenzie on Tarleton. The first of these appeared in a London newspaper while the war was still in progress. In this, Mackenzie complained to Tarleton that, "You got yourself and your party completely ambuscaded, completely surrounded, upon all sides, by Mr. Morgan's rifle men. What was the consequence? The two detachments of British were made prisoners after a great slaughter was made among them, your legion dragoons were so broke by galling fire of rifle shot that your charging was in vain, till prudence, on your side, with about twenty men who were well mounted, made your retreat good, by leaving the remains of the poor blended legion in the hands of Mr. Morgan."

Sources:

Philip R. N. Katcher (1973). Encyclopedia of British, Provincial, and German Army Units 1775-1783. Stackpole Books.

Johann Ewald (1979). Diary of the American War: A Hessian Journal. Translated by Joseph P Tustin. New Haven: Yale University Press.

John Moncure's online history of the battle, The Cowpens Staff Ride and Battlefield Tour, includes a transcription of statements by Tarleton, Cornwallis, Howard, and Mackenzie's August 9, 1782, letter in the London Morning Chronicle.

William Moultrie's 1802 Memoirs of the American Revolution.

A summary of the Otho Williams papers can be found here. The item in question is a letter from Williams to Dr. James McHenry, dated January 23, 1781.

Friday, January 23, 2009

The Main Line at Cowpens: The Right Wing Collapses

[Minor edits 12/28/09]

In my last post I reviewed the statements of Private Robert Long of the South Carolina militia. Long's statements place him on the right wing of the main line. His statements also indicate that this wing of militia fled shortly after the militia line retreated.

Historians have not recognized an incident of this kind occurring. However, Robert Long is not alone in indicating that such a collapse of the right wing of the main line occurred.

Captain Henry Connelly, who commanded a company of North Carolina state troops wrote that:

"The company which belonged to this applicant was placed under Col Howard, on the extreme right of the division, and this applicant commanded a company in the center. Our company, when just about to catch up our horses which were hid about four hundred paces in the rear of the line of battle, [was attacked by the enemy which] fell upon us with great fury, but we were fortunately relieved by Washington's Legion that hastened to our assistance."

Connelly first places his company on the right wing of the main line ("under Col Howard"), then indicates that his men broke and were overtaken by the British cavalry while in flight. This experience matches those of units in the militia line, but not that of Howard's Continentals or Triplett's Virginians (at least those on the left wing).

British accounts do not describe the right wing of the main line, much less its rout during the battle, but this omission is less significant than it seems. The few extant British accounts of Cowpens are vague in their description of how the Americans were deployed. However, British participants did describe an attack against the main line that can easily be interpreted as breaking the right wing of that line.

Lieutenant Roderick Mackenzie claimed that “the second [American] line, now attacked, made a stout resistance. Captain Ogilvie, with his troop, which did not exceed forty men, was ordered to charge the right flank of the enemy. He cut his way through their line, but, exposed to a heavy fire, and charged at the same time by the whole of Washington's dragoons, was compelled to retreat in confusion.”

Loyalist Alexander Chesney recorded in his journal that “the British Legion… supported by a detachment of the 71st Regt under Major McArthur broke the Riflemen without difficulty.” In other words, Ogilvie's dragoons attacked the American right flank, cut through their line, and broke them without difficulty. This occurred at the same time that the 1st battalion of the 71st Foot was advancing against the right side of the American main line.

The collapse of the right wing, as suggested by the accounts of Long, Connelly, Mackenzie, and Chesney, can be understood as an important event in setting the stage for the climax of the battle. In the words of Lieutenant-Colonel John Eager Howard:

"[When the British] formed their line they shouted and made a great noise to intimidate, and rushed with bayonets upon the militia who had not time, especially the riflemen to fire a second time. The militia fell into our rear, and part of them fell into the rear of my right flank where they afterwards renewed the action. The british advanced until my regiment commence firing. I soon observed, as I had but about 350 men and the british about 800, that their line extended much further than mine particularly on my right, where they were pressing forward to gain my flank.--To protect that flank, I ordered the company on my right to change its front so as to oppose the enemy on that flank. Whether my orders were not well understood or whether it proceeded from any other cause, in attempting this movement some disorder ensued in this company which rather fell back than faced as I wished them."

Howard did not explicitly describe a collapse of the right wing of the main line. However, a comparison of Howard's account with William Johnson’s history does implicitly indicate he believed that there was a cavalry attack against the militia on his right. Also, the statement that the British "line extended much further than mine particularly on my right," is consistent with his having lost the covering force on his right flank. The loss of this force also helps explain why he felt compelled to refuse his right.

Crisis at Cowpens. Only Howard's Continentals (#4) and Triplett's Virginians (#5) remain in line to stem the British attack. Howard has begun to refuse his right flank (triggering the accidental retreat of the Continental infantry). Scattered elements of the right wing of the main line (#3), and the right (#6) and left (#7) wings of the militia line are attempting to reform in the rear. The militia are protected by the American cavalry (#1 and #2).

An interesting aside is that when accounts of the battle are compared, the only officers mentioned as commanding several militia units on the main line are Major Francis Triplett of Virginia and Colonel Andrew Pickens of South Carolina. Howard pointed out that Triplett commanded on his left. Pickens commanded the front-line militia. If Triplett remained throughout the battle on the left wing of the main line then perhaps no one had overall command of the various units on the right wing. Perhaps this lack of command and control was responsible for the initial incorrect deployment of Hayes' regiment (see The Statements of Private Robert Long) and was also a contributing factor in the collapse of the right wing.

Sources:

Will Graves transcribed the pension application of Henry Connelly (.pdf).

See The Statements of Private Robert Long for a transcription of his statements.

John Moncure's online history of the battle, The Cowpens Staff Ride and Battlefield Tour, includes a transcription of statements by Howard and Mackenzie.

The Journal of Alexander Chesney.

Wednesday, January 21, 2009

The Statements of Private Robert Long

[Minor edits 12/27/09]

Private Robert Long of South Carolina left two statements that described the deployment of American forces and important events during the battle of Cowpens. His accounts strike me as important evidence about the battle, although it has been largely overlooked by historians. Of the histories that I've read, only Lawrence Babits used them to shape his understanding of how Cowpens was fought.

One of his statements was written in support of Captain Samuel Hammond's pension application. In it, he said, "[Hammond] was in the Battle of Cowpens (that is Tarleton's defeat)... he was then promoted to Major, believes he commanded on the front line left wing and this deponent [i.e., Long] was in the center line on the right wing in Captain Ewing's company commanded by Colonel Joseph Hayes, next to Colonel Howard's Infantry."

(He did not provide any details about his service at Cowpens in his own pension application).

Long's second statement appeared in John Logan's 1859 A History of the Upper Country of South Carolina (not available online). The relevant text is as follows:

"...The infantry marched out in sections, and divided two and two as they got ten paces of Hayes' regiment already formed across the road. Hayes regiment then moved to the right of the infantry, 70 or 80 yards in advance; Major McDowell, of North Carolina, in advance of us 70 or 80 yards, and Major Triplett, of Virginia, in our rear; Cols. Thomas and Roebuck in the extreme right. The left wing was similarly formed of militia. The cavalry in rear of infantry... Hayes' regiment having advanced too far were to retreat and form on our old ground; when the North Carolinians were retreating in order to be ready to cover their retreat; failing of this the Virginians broke before we got to them. We were not rallied until Gen. Morgan did it in person. At that time Tarleton brought 200 or 300 cavalry round in the rear of our left wing of militia. Col. Washington charged them with his cavalry; at the same time our infantry charged the British with the bayonet and took their field pieces, while those on the right and left surrendered or retreated."

The text in Long's statements is somewhat difficult to follow. Below I offer a detailed interpretation of what Long said:

On the morning of the 17th, the Americans deploy on the battlefield. Hayes' regiment was deployed across the Green River Road close to the spot where Morgan planned to place Howard's continentals. The companies comprising Howard's light infantry (referred to as "the infantry" in Long's statement) marched down the road in column formation. They marched to within 10 paces of Hayes' regiment, then deployed in a line of two ranks to the right (south) of the road.

The Americans Deploy, Part 1. (Click to enlarge). Hayes' regiment is drawn up across the Green River Road. Lieutenant-Colonel John Eager Howard's infantry march down the road behind them, followed by Major Francis' Triplett's Virginians.

The Americans Deploy, Part 2. (Click to enlarge). Hayes' regiment is drawn up across the Green River Road. Howard's Continentals have completed their deployment. Major Francis' Triplett's Virginians are beginning to deploy as well. Other units can be seen preparing to deploy.

After the continentals deployed, Hayes' regiment moved to the right of the infantry until they reached a point at which they were midway (i.e., about 75 yards) between the Continentals and McDowell's North Carolinians. Describing the rest of the American deployment, Long noted that Triplett's Virginians were in their rear, the South Carolina militia under Thomas and Roebuck were on "the extreme right" of the right wing of the militia, and that there was also a "left wing" "similarly formed of militia." The cavalry were positioned behind the Continentals.

The Americans Deploy, Part 3. (Click to enlarge). Hayes' regiment is on the right of the Continentals, midway between the Continentals' right and Major Joseph McDowell's North Carolinians. At this stage, the American deployment is largely complete.

When Hayes' regiment took up this position they had "advanced too far," and were ordered to fall back to their "old ground." This does not mean 10 paces in front of the continentals, but rather further back from the militia line. Completing this move, they were "in the center line on the right wing... next to Colonel Howard's Infantry." Long called this the center line to distinguish it from the militia line in front and "The cavalry in rear." From this position they would "be ready to cover" the retreat of McDowell's North Carolinians.

The Americans Deploy, Part 4. (Click to enlarge). The positions of the American units at the start of the battle. Hayes' regiment has now joined the right wing of the main line.

When the militia line broke early in the battle, Hayes' regiment did not stand their ground (his words were "failing of this"). Falling back, they might have rallied behind the Virginians (Buchanan's company). Instead, "the Virginians broke before we got to them. We were not rallied until Gen. Morgan did it in person."

Sources:

John Logan. (1859). A History of the Upper Country of South Carolina.

Will Graves transcribed the pension application of Samuel Hammond, which includes a statement by Robert Long (.pdf file).

Will Graves transcribed the pension application of Robert Long (.pdf file).

Tuesday, January 20, 2009

Barack Obama on the American Revolution

President Barack Obama invoked the American Revolution today in two parts of his inaugural address. His eloquent words made me think of why the story of the American Revolution still matters in modern America.


First Excerpt:

"In reaffirming the greatness of our nation, we understand that greatness is never a given. It must be earned. Our journey has never been one of shortcuts or settling for less. It has not been the path for the faint-hearted — for those who prefer leisure over work, or seek only the pleasures of riches and fame. Rather, it has been the risk-takers, the doers, the makers of things — some celebrated but more often men and women obscure in their labor, who have carried us up the long, rugged path towards prosperity and freedom.

"For us, they packed up their few worldly possessions and traveled across oceans in search of a new life.

"For us, they toiled in sweatshops and settled the West; endured the lash of the whip and plowed the hard earth.

"For us, they fought and died, in places like Concord and Gettysburg; Normandy and Khe Sahn.

"Time and again these men and women struggled and sacrificed and worked till their hands were raw so that we might live a better life. They saw America as bigger than the sum of our individual ambitions; greater than all the differences of birth or wealth or faction."


Second Excerpt:

"Our challenges may be new. The instruments with which we meet them may be new. But those values upon which our success depends — hard work and honesty, courage and fair play, tolerance and curiosity, loyalty and patriotism — these things are old. These things are true. They have been the quiet force of progress throughout our history. What is demanded then is a return to these truths. What is required of us now is a new era of responsibility — a recognition, on the part of every American, that we have duties to ourselves, our nation, and the world, duties that we do not grudgingly accept but rather seize gladly, firm in the knowledge that there is nothing so satisfying to the spirit, so defining of our character, than giving our all to a difficult task.

"This is the price and the promise of citizenship.

"This is the source of our confidence — the knowledge that God calls on us to shape an uncertain destiny.

"This is the meaning of our liberty and our creed — why men and women and children of every race and every faith can join in celebration across this magnificent Mall, and why a man whose father less than sixty years ago might not have been served at a local restaurant can now stand before you to take a most sacred oath.

"So let us mark this day with remembrance, of who we are and how far we have traveled. In the year of America's birth, in the coldest of months, a small band of patriots huddled by dying campfires on the shores of an icy river. The capital was abandoned. The enemy was advancing. The snow was stained with blood. At a moment when the outcome of our revolution was most in doubt, the father of our nation ordered these words be read to the people:

"'Let it be told to the future world ... that in the depth of winter, when nothing but hope and virtue could survive...that the city and the country, alarmed at one common danger, came forth to meet (it).'

"America, in the face of our common dangers, in this winter of our hardship, let us remember these timeless words. With hope and virtue, let us brave once more the icy currents, and endure what storms may come. Let it be said by our children's children that when we were tested we refused to let this journey end, that we did not turn back nor did we falter; and with eyes fixed on the horizon and God's grace upon us, we carried forth that great gift of freedom and delivered it safely to future generations."

Sunday, January 18, 2009

The Militia Line at Cowpens

[Revised 12/26/09]

General:

An 1822 history, Sketches... of the Highlanders of Scotland, which tells the story of the battle of Cowpens from the perspective of the Scottish soldiers in the 71st Foot, provided one of the clearest descriptions of where the American militia line stood during the battle.

"On the morning of the 17th January 1781, intelligence was received that General Morgan was in front, with his force drawn up on a rising ground, thinly covered with pine trees; the front line being on the crown of the rising ground, and the second 400 paces in rear of the first line."

In other words, there were militia positioned near the number 1 on the map below.

Not all of the militia were deployed in this one spot. Rather, the militia line was divided into two wings, with one wing located near the crest of Elevation #1 (#6 on the map below), and the other wing located near the Green River Road (#7 on the map below).

1 = Continental Light Dragoons, 2 = Mounted Militia, 3 = Right Wing of the Main Line, 4 = Continental Infantry, 5 = Left Wing of the Main Line, 6 = Right Wing of the Militia Line, 7 = Left Wing of the Militia Line, 8 = Skirmishers

Clear evidence for this deployment can be found in the after action report of the American commander, Brigadier-General Daniel Morgan. Morgan stated:

"An hour before daylight [on the morning of the battle] one of my scouts returned and informed me that Lieut. Col. Tarleton had advanced within five miles of our camp. On this information, I hastened to form as good a disposition as circumstances would admit, and from the alacrity of the troops, we were soon prepared to receive them... The volunteers from North Carolina, South Carolina, and Georgia, under the command of the brave and valuable Col. Pickens, were situated to guard the flanks. Maj. McDowall, of the North Carolina volunteers, was posted on the right flank in front of the line, one hundred and fifty yards; and Maj. Cunningham, of the Georgia volunteers, on the left, at the same distance in front, Colonels Brannon and Thomas, of the South Carolinans, were posted on the right of Maj. McDowall, and Cols. Hay and McCall, of the same corps, on the left of Maj. Cunningham."

Other participant accounts also indicated that the militia were divided into two parts.

Major Joseph McJunkin of South Carolina recalled that, "the regulars [were] in the center, commanded by Col. Howard, the militia on the right and left—the right commanded by Gen. Pickens, the left by _________ [blank in the original]. Col. Washington in the rear with his troop of cavalry."

Sergeant-Major William Seymour of the Delaware Continentals recorded in his journal that, "The militia were... drawn up in front of the standing troops [i.e., the Continentals] on the right and left banks, being advanced about two hundred yards.”

Private Robert Long of South Carolina described the two militia wings to the front of his regiment. Directly in front of him on the right wing was "Major McDowell, of North Carolina... Cols. Thomas and Roebuck [were] in the extreme right. The left wing was similarly formed of militia." See The Statements of Private Robert Long.

Private Adam Files of South Carolina recalled in his pension application that, "The right of the Army was commanded by General Pickens. The left by Colonel McCall and these Center by General Morgan."

Private John Harris of South Carolina claimed in his pension application that, "I was in the left wing for the militia under Col. McCall."

Composition of the Right Wing:

The right wing of the militia line consisted of North and South Carolinians. The North Carolinans were organized into a single battalion under the command of Major Joseph McDowell. Following, in part, the analysis of Lawrence Babits described in A Devil of a Whipping: The Battle of Camden, the South Carolinians were organized into three small battalions. These South Carolinians included the 1st Spartan Regiment, under the command of Colonel John Thomas, and two battalions of the 2nd Spartan Regiment, under the command of Colonel Thomas Brandon, and Lieutenant-Colonel Benjamin Roebuck. According to South Carolinian Aaron Guyton, these battalions were well linked with each other and Colonel Joseph Hayes' Little River regiment:

"I was under Colonel Brandon who had a few Brave men – who stood true for the cause of liberty in the back part of the State who composed our little Army I was out the most of this time sometimes we had 75 sometimes 150 men, and sometimes we had four or five Colonels with from 50 to 150 men. Each of them had command of a Regiment at home & sometimes not more than 5 of his men with him. The colonels were Brandon, Hase, Roebuck, White." Following Babits, these officers were Colonel Thomas Brandon, Colonel Joseph Hayes, Lieutenant-Colonel Benjamin Roebuck, and Major Henry White (second-in-command to John Thomas).

Morgan placed McDowell's battalion to the left side of the South Carolinians. Robert Long's account further adds that Thomas and Roebuck were on the extreme right. By extension, Brandon's battalion must have been deployed next to McDowell's men.

Composition of the Left Wing:

The left wing of the militia line consisted of Georgians and South Carolinians.

Major John Cunningham commanded a small battalion of Georgia militia. According to Major James Jackson of Georgia, Cunningham's command was comprised of three companies under the commands of Captains Samuel Hammond, Joshua Inman, and George Walton. Babits named a Captain Richard Heard in place of Hammond. One David Thurmond claimed, in his pension application, to have been a captain in this battalion at the battle.

Major (soon to be Colonel) James McCall commanded a regiment of South Carolina State Troops. McCall's regiment was recruited from Georgia and South Carolina "refugees." This regiment was supposed to be equipped as dragoons, but the regiment was still being organized at the time of the battle, and only a relatively small number were prepared to fight in that capacity. McCall took personal command of those troops equipped as dragoons and fought alongside Lieutenant-Colonel William Washington and the remainder of the American cavalry during the battle. The rest of the troops served under McCall's second-in-command, Captain (soon to be Major) Samuel Hammond. (Hammond's pension application is the source of many of these details).

Morgan's account indicates that the Georgians served on the right end of the left wing, while South Carolinians served on the left. Morgan placed Colonel Joseph Hayes' regiment of South Carolinians on the left wing, but Long convincingly placed it on the main line.

There are some other bodies of troops that were likely a part of the left wing that are generally not described in accounts of the battle. These may have included Captain John Irby's company of Georgia refugees (see Little River Regiment), and other, miscellaneous volunteers (see pension application of George Harbinson).

More significantly, Colonel Andrew Pickens' Upper Ninety-Six District Regiment of South Carolina militia was likely on the left wing. The few references to Pickens' regiment in accounts of the battle may reflect the absence of the regiment's senior leadership. Pickens was given overall command of the front-line militia and so was away from his regiment. Major Alexander Noble possibly had command of the American baggage (at least this was his assignment after the battle). Private Patrick Norris mentioned that Noble was "officer of the guard" and after the battle "conducted the forge wagon with a considerable number of arms, that were taken from Tarleton at his defeat to Gilbertstown in North Carolina."

McCall was well known to the men of Pickens' regiment having come from the same part of the state and having been, at one time, a captain in the regiment. It can be difficult to distinguish in some pension applications whether the applicant was a South Carolina refugee attached to McCall or whether the individual was in Pickens' regiment.

John Harris is one individual whose account is somewhat ambiguous.

Early in the war he was clearly in what would become Pickens' regiment: "In the summer of 1778–I was again called out and went in Captain Noble’s Company under Col. Andrew Williamson and Maj. Andrew Pickens." This was before Noble and Pickens had been promoted.

Sometime in 1780, however, he "joined Col. (then Capt McCall) in an enterprise which he under took to surprize the British at Augusta... [later] McCall retreated up the Saluda River spent two weeks in the mountains on the border of North Carolina, almost without food, and joined Gen’l. Morgans army in North Carolina a short time after the Battle of Kings Mountain. With this army I remained until the battle of the Cowpens Jan’y. 1781, in which I was in the left wing for the militia under Col. McCall."

A number of pension applications, however, clearly establish Pickens' regiment as one present at the battle.

Charles Holland was a private in Joseph Pickens' company of Colonel Andrew Pickens' regiment:

"he volunteered, some time in the month of September (as well as he can recollect) 1776, in a company of militia under the command of Captain James McCall, in the District then called Ninety-Six, now Abbeville, in the State of South Carolina, that said company was attached to a Regiment, or corps of men, under the command of Major Andrew Williamson or Winson, the Colonel, if any, not recollected; that he continued with Captain McCall until about a month July 1777, when the Captain was taken prisoner by the Indians & this relator was transferred to a militia company commanded by Captain Andrew Pickens, in the same Regiment; that soon after this, Williamson was promoted to the command of the Regiment & Captain Pickens was made the Major... [later,] one Joseph Pickens was promoted to the captaincy of said Company... and Major Andrew Pickens became the Commandant of this Regiment; and one Alexander Noble became Major."

Holland was also at the battle of Cowpens, where a British cavalryman wounded him "by a sword thrust through the body, which disabled him for active service for two or three months." Others in his regiment experienced the same fate.

James Pettigrew was a private in James Caldwell's company:

"The next battle he was in of any note was at the Cowpens under General Morgan. General Pickens, Col. Anderson, Colonel McCall, Major Noble, Lieut. Carlile [Francis Carlisle] were in that engagement and most of them, if not all, were under the command of General Pickens and from Abbeville District. He recollects that Colonel Washington with his cavalry was there and saved the militia from inevitable destruction. James Caldwell commanded this applicant's company and was cut almost to death by Tarlton's horsemen so much so that he had to be borne from the field."

Jeremiah Files was a private in John Files' company:

Jeremiah "enrolled himself as a volunteer under Colonel Andrew Pickens and at the time of his enrollment resided in Abbeville District in the State of South Carolina and marched from thence as a volunteer with Col.Pickens to Granvile Shoals on Packlet River and there joined General Morgan about the first of January in the year 1781 and then placed under the command of Captain McKall [James McCall] in the Battalion of Major Noble in the Regiment of Colonel Andrew Pickens of the South Carolina Militia... we marched under General Morgan to the Cowpens and was at the Battle fought there against Tarltons Legion on the Wednesday Morning on the 17th day of January 1781... This Deponent was wounded by Tarleton's Dragoons on the head – on the left arm and on the right hand each wound was made with a sword & the wounds are now visible the wounds Greatly Disabled this Deponent -- & Stunned him for some time & one Captain Alexander of Rowan County North Carolina was the first man to come to his relief & informed him of our victory."

Samuel Hammond's dubious sketch of the battle shows Pickens' regiment on the left wing of the main line (see The Hammond Map). However, Pettigrew's statement (see above) links McCall with Pickens' regiment, suggesting that their regiments served together during the battle.

Sources:

David Stewart's 1825 Sketches... of the Highlanders of Scotland is available through Google Books.

Morgan's report of the battle can be found in James Graham's 1856 The Life of General Daniel Morgan.

For a transcription of Long's accounts of the battle see The Statements of Private Robert Long.

John Moncure's The Cowpens Staff Ride and Battlefield Tour webpage has a transcription of the statements by Hammond, Seymour, and Howard.

This issue of the online magazine, Southern Campaigns of the American Revolution has complete transcriptions and commentary on McJunkin's statements.

A transcription of William Seymour's journal can also be found on this Battle of Camden website.

Will Graves transcribed the pension application of David Thurmond (.pdf file).

Will Graves transcribed the pension application of Adam Files, which can be read here (.pdf file).

C. Leon Harris transcribed the pension application of John Harris, which can be read here (.pdf file).

Lawrence Babits' A Devil of a Whipping: The Battle of Cowpens is available through amazon.com.

Will Graves transcribed the pension application of Aaron Guyton (.pdf file).

Will Graves transcribed the pension application of Samuel Hammond (.pdf file).

C. Leon Harris transcribed the pension application of George Harbinson (.pdf file).

Will Graves transcribed the pension application of Patrick Norris (.pdf file).

Will Graves transcribed the pension application of Charles Holland (.pdf file).

Nan Overton West transcribed the pension application of James Pettigew (.pdf file).

Will Graves transcribed the pension application of Jeremiah Files (.pdf file).

Saturday, January 17, 2009

The Main Line at Cowpens: Location

[Revised 12/26/09]

There are three elevations of note on the Cowpens battlefield, designated by the numbers 1-3.

Elevation #1 is the location best associated with the battle. Recent histories of the battle all place the militia line on this elevation (although not all on exactly the same spot).

Captain Samuel Hammond of South Carolina described the battlefield in these terms: “The ground on which the troops were placed, was a small ridge [Elevation #1], crossing the road at nearly right angles. A similar ridge [Elevation #2], nearly parallel with this, lay between three hundred and five hundred yards in his rear. The valley between was made by a gentle slope; it was, of course, brought within range of the eye; passing from one to the other ridge, the land was thickly covered with red oak and hickory with little if any underbrush. The valleys extending to the right of the general's camp, terminated in a small glade or savanna."

Hammond also stated that "The front line" was placed on "the rising ground beyond the valley," meaning Elevation #1. He noted that the second, or main line, was to be 150 yards behind the front line. Other sources either agreed with him or gave a slightly longer distance (2oo yards). This indicates that the main and militia lines were situated roughly in the positions shown below. (The contour lines are at 20-foot intervals; with access to a more fine-grain map I would perhaps shift the units slightly in one direction or another).

1 = Continental Light Dragoons, 2 = Mounted Militia, 3 = Right Wing of the Main Line, 4 = Continental Infantry, 5 = Left Wing of the Main Line, 6 = Right Wing of the Militia Line, 7 = Left Wing of the Militia Line, 8 = Skirmishers

The position of the main line seems somewhat odd being positioned between Elevations 1 and 2, rather than on either one. However, participant accounts do indicate that the main line was in this area. The son of North Carolina militiaman Thomas Lackey learned from his father "That at the Battle of the Cowpens the regulars were situated rather behind a hill" (i.e., Elevation #1). Thomas Young of South Carolina remembered that “The battle field was almost a plain with a ravine on both hands, and very little under growth in front or near us." Young was serving with the mounted militia (Unit #2 on the map above). He noted that the main line's "right flank [was] resting upon the head of the ravine on the right... [and the] left flank [was]resting near the head of the ravine on the left." The location of these "ravines" is indicated, in part, by the two creeks on either side of the main line.

Sources:

John Moncure's The Cowpens Staff Ride and Battlefield Tour webpage has a transcription of the statements by Samuel Hammond and Thomas Young.

Joseph Johnson's 1851 Traditions and Reminiscences Chiefly of the American Revolution in the South is the original source of Hammond's statement.

Will Graves transcribed the pension application of Thomas Lackey (.pdf file).

Wednesday, January 14, 2009

The Main Line at Cowpens: Composition

[Minor edits 12/26/09]

In my last post, I noted that Brigadier-General Daniel Morgan provided few details about the deployment of the American main line at the battle of Cowpens; however, comments by other writers suggest the formation illustrated below. In this post I comment on the units that were deployed main line.

Here is a listing of units that were on the main line:

Left Wing (Major Francis Triplett)

  • Major Francis' Triplett's company of Virginia militia. Sergeant Martin of this company recalled that, "I was in the road all the time of the action... Lieutenant Ewen [James Ewing] was on the left of the Maryland Troops near me." This places Triplett's company on the far right of the wing. Triplett was promoted to major and commanded the entire left wing during the battle. Sources disagree as to who commanded his company in his place. Either it was Ensign Combs (promoted to Captain) or Lieutenant Dearing.
  • Captain James Tate's company of Virginia militia. Lieutenant-Colonel John Eager Howard, writing long after the war, noted, "I am positive that Triplett and Tate were on my left."

Continentals in the Center (Lieutenant-Colonel John Eager Howard)

  • Three companies of Maryland Continentals. According to Lawrence Babits, in A Devil of a Whipping, these companies were commanded by captains Richard Anderson, Henry Dobson, and Nicholas Mangers.
  • Captain Robert Kirkwood's company of Delaware Continentals. Lieutenant Thomas Anderson, Sergeant-Major William Seymour and Private Henry Wells of this company left accounts of the battle.
  • Captain Andrew Wallace's company of Virginia Continentals. This company featured prominently in Lieutenant-Colonel John Eager Howard's description of the battle. Private William Jewell of this company stated in his pension application that "He enlisted as a regular... under Captain Wallace of Augusta County Virginia for three years." At "Charlotte in North Carolina... we Joined General Greene: General Morgan was here permitted to select about 20 men to reinforce his own little band of perhaps 300 men against Tarleton at the Cowpens – he was selected as one."
  • Other musket-and-bayonet-wielding infantry. Babits stated his belief that some Virginia State troops served on the main line (as a unit distinct from Triplett's or Wallace's Virginians). Some North Carolina Continentals also may have served. John Hill, a North Carolina Continental, was said to have pursued, at the end of the battle of Cowpens, "a British soldier – some 60 or 75 yards. He the said Hill stuck his Bayonet in the back of the British soldier by throwing his musket at him this wound was slight and the British soldier continued to retreat."

Right Wing

  • Captain Patrick Buchanan's company of Virginia militia. Private William Neel wrote this company "...formed in single file with the Militia on the right of the Regulars..." Brigadier-General Daniel Morgan, in his after action report, also stated that Buchanan's company was on "the right of the line.”
  • Captain Henry Connelly's company of North Carolina state troops. Connelly claimed, in his pension application that, "The company which belonged to this applicant was placed under Col Howard, on the extreme right of the division, and this applicant commanded a company in the center."
  • Colonel Joseph Hayes' regiment of South Carolina militia. (See The Statements of Private Robert Long). Comments by Neel, Connelly, and Long when taken together suggest that Buchanan's company was closest to the Continentals, followed by Connelly's company, and finally Hayes' regiment.

Other Militia Units:

There are some other units of militia whose position on the main line cannot be so easily ascertained. These include:

  • Captain James Gilmore's company of Virginia militia. This company was definitely at the battle, but it is unclear whether it served on the left wing or on the right.
  • Captain Mordecai Clark's company of North Carolina militia. There are indications in pension applications that this company served on the main line.
  • "Captain Beaty's" company of militia. This company of South Carolina militia are placed on the right wing in Captain Samuel Hammond's account of the battle. Babits discussed several different possibilities for the identity of this captain, but he did not place this company on the main line.
  • Other Virginia militiamen. Babits stated, based on pension applications, that some Virginia militiamen in Major David Campbell's battalion of Virginia militiamen were present at the battle, and presumably (although the pension applications do not provide details) served on the main line.

Sources:

Will Graves transcribed the pension application of Benjamin Martin (.pdf).

Lawrence Babits' A Devil of a Whipping: The Battle of Cowpens is available through amazon.com

John Moncure's online history of the battle, The Cowpens Staff Ride and Battlefield Tour, includes a transcription of statements by Howard, Anderson, Seymour, Wells, Neel, and Morgan.

Will Graves transcribed the pension application of William Jewell (.pdf).

Will Graves transcribed the pension application of John Hill (.pdf).

Will Graves transcribed the pension application of Henry Connelly (.pdf).

Tuesday, January 13, 2009

The Main Line at Cowpens: Organization

Morgan, in his after action report, briefly summarized the deployment of his forces. In regards to the second, or main line, he reported that “The light infantry, commanded by Lieut. Col. Howard, and the Virginia militia under the command of Major Triplett, were formed on a rising ground, and extended a line in front." He also mentioned, in an aside, that "Tate and Buchanan, with the Augusta riflemen, [were deployed] to support the right of the line.”

This description is not detailed. The idea, like other post battle reports written during this period, was to provide a synopsis of the battle and to officially recognize the contributions of important subordinates.

To find a detailed description of how the main line was deployed, it is necessary to sift through the accounts of participants, written after the war.

Captain Samuel Hammond of South Carolina wrote that, "The second line will be composed of the continental regiment of Maryland troops, commanded by Lieutenant-Colonel Howard; on the left of the second line, falling back one hundred yards in its rear, a continuation of the second line, or third line, will be formed, advancing its left wing towards the enemy, so as to bring it nearly parallel with the left of the continental troops, upon the second line. The Virginia militia, commanded by Major Triplet, with the South-Carolina militia, commanded by Captain Beaty, will form to the right of the second line; the left nearly opposite to the right of the second line, one hundred yards in its rear; the right extending towards the enemy, so as to be opposite to or parallel with the second line."

The units numbered 3, 4, and 5 in the map below show what this formation would have looked like.

1 = Continental Light Dragoons, 2 = Mounted Militia, 3 = Right Wing of the Main Line, 4 = Continental Infantry, 5 = Left Wing of the Main Line, 6 = Right Wing of the Militia Line, 7 = Left Wing of the Militia Line, 8 = Skirmishers

What Hammond described seems unconventional. However, there is confirming evidence that it is correct. Major-General François-Jean de Chastellux (a member of the French expeditionary force in America) interviewed one of the Augusta county riflemen that served in this formation and learned that Morgan "divided his riflemen upon the two wings, so as to form, with the line, a kind of tenaille, which collected the whole fire, both directly and obliquely, on the center of the English…" He also wrote that he later met Morgan and that Morgan confirmed his understanding of how the battle was fought. (For examples of a what a tenaille can look like, see here and here).

This "tenaille"-like formation seems sensible for the occasion. By placing rifle-bearing militiamen 100 yards behind and to the side of the regulars, Morgan enabled these militia to aid the regulars with their fire, while at the same time shielding them from a British bayonet charge. Because the rifles of the militia had a much longer range than the muskets of the Continentals, both groups would have been able to commence firing on the British at the same time.

This formation also seems superior to the one usually attributed to the American main line in which the Continentals and militia are placed side-by-side. The two types of units had very different fighting styles. The Continentals fought in a tight formation, using tactics very similar to those of the British. At Cowpens, according to Thomas Young, "The regulars, under the command of Col. Howard, a very brave man, were formed in two ranks." The militia were less well disciplined, their rifles were slower-loading, they fought in a single rank (see statement by William Neel), and they were ill-equipped to withstand a bayonet charge. A bayonet charge directed against the militia on the main line would most likely have forced them to suddenly flee, leaving the Continentals dangerously exposed.

Sources:

John Moncure's The Cowpens Staff Ride and Battlefield Tour webpage has a transcription of the statements by Daniel Morgan, Samuel Hammond, Thomas Young and William Neel.

Joseph Johnson's 1851 Traditions and Reminiscences Chiefly of the American Revolution in the South is the original source of Hammond's statement.

François-Jean de Chastellux's 1787 Travels in North-America, in the Years 1780, 1781, and 1782.

Sunday, January 11, 2009

The Hammond Map

An account by Captain Samuel Hammond of South Carolina is one of the most important statements about how the American army was deployed at the battle of Cowpens. Unfortunately, it is also contradictory and confusing.

Hammond wrote of the evening before the battle:

"Orders had been issued to the militia, to have twenty-four rounds of balls prepared and ready for use, before they retired to rest. A general order, forming the disposition of the troops, in case of coming to action, had also been prepared, and was read to Colonels Pickens and McCall, Major Jackson and the author of these notes, in the course of the evening. No copy was ever afforded to either of these authors, before the battle, and the author of these notes has never since seen them, but in the, course of the same evening he made the following notes upon them, then fresh in his memory, and which was shown to Major Jackson and Colonel McCall, and approved by them as correct as far as they went. To show those concerned what would be their stations, the author drew out a rough sketch of the position set forth in the general order, and after the action, the rough sketch of the enemy's position was added. No perfect or accurate sketch of the enemy's position was ever drawn: this was only taken by the eye, not with mathematical instruments; and yet no opportunity has been afforded of correcting it. Nevertheless, this gives you a still better idea of the affair, than could be obtained without it.

"The order commenced in substance thus:

"As the enemy seems resolved to force us into action, the numbers and spirit of this little band of patriot soldiers seems to justify the general in the belief that they may be met with confidence, defeated and driven back. To prepare for which, the following order will be observed.

"The front line will be composed of that part of Colonel McCall's regiment of South-Carolina State troops, who have not yet been equipped as dragoons, under the command of Major Hammond; the Georgia volunteers, commanded by Lieutenant-Colonel Cunningham, and the North Carolina volunteers, under the command of Major McDowal, Colonel Cunningham will take post on the right, Major McDowal on the left of the line, southwest of the road, upon the rising ground beyond the valley in front, three hundred to three hundred and fifty yards in rear of this cantonment or camp, with the left resting upon the road. Major Hammond will take post on the left of the road, in line with Colonel Cunningham; supported on the left by Captain Donoly, of the Georgia refugees.

"The second line will be composed of the continental regiment of Maryland troops, commanded by Lieutenant-Colonel Howard; on the left of the second line, falling back one hundred yards in its rear, a continuation of the second line, or third line, will be formed, advancing its left wing towards the enemy, so as to bring it nearly parallel with the left of the continental troops, upon the second line. The Virginia militia, commanded by Major Triplet, with the South-Carolina militia, commanded by Captain Beaty, will form to the right of the second line; the left nearly opposite to the right of the second line, one hundred yards in its rear; the right extending towards the enemy, so as to be opposite to or parallel with the second line, The main guard will hold its present position, and be commanded as at present by Colonel Washington's cavalry, with such of Colonel McCall's regiment of new raised South-Carolina State troops, as have been equipped for dragoons, will be a reserve, and form in the rear of Colonel Pickens, beyond the ridge, one or two hundred yards, and nearly opposite the main guard, north of the road.

"This is not meant as a correct report of the general order, but as nearly so as the memory, influenced by such events, could be expected to retain. The sketch annexed will give you a further illustration of the important event.”

One problem with this statement concerns certain omissions. He named Triplett and Beaty as serving with a wing of troops to the right of Howard's Continentals, but he did not identifiy the troops serving to the left of the Continentals. He said that McCall's dragoons were to be held in reserve behind Pickens, but he didn't identify where Pickens was stationed.

There is also a contradiction in his statement about the placement of troops on the front line. First he said first that, "Colonel Cunningham will take post on the right, Major McDowal [sic] on the left of the line, southwest of the road." This would seem to indicate that both commands were to be southwest of the road, with Cunningham on the right and McDowell on the left. However, he then said that "Major Hammond will take post on the left [i.e., northeast] of the road, in line with Colonel Cunningham." If Hammond were in line with Cunningham, then Cunningham would have been on the left of McDowell, not on the right.

Confusion also arises from a comparison of Hammond's written accounts with the maps he allegedly drew. Here is the "sketch," in two parts, which was originally printed in Joseph Johnson's 1851 Traditions and Reminiscences Chiefly of the American Revolution in the South.


The first map seems to have the directional arrow pointing in the wrong direction (South rather than North). McCall's dragoons have disappeared. There is a "valley or ravine" running across the road in front of the American position that does not correspond with the actual terrain (see this post). There are also two second lines, each consisting of the same troops, but in different positions. Perhaps the intention was to show the position of these troops at two different points in time. However, in neither case do the wings on either side of Howard's continentals begin 100 yards behind the regulars as the text has them.

The second map has Hammond on the far right of the American line when the text has him on the far left.

Of the two, the textual description seems more reliable. It is more detailed than the maps, and seems to better reflect Hammond's recollection. (I wonder if the printer, in preparing the sketch for publication, did not err in attaching labels to the sketch). The textual description also meshes well with other descriptions of the American deployment, including that in Brigadier-General Daniel Morgan's after action report. The maps are considerably less consistent with other participant accounts.

Sources:

Joseph Johnson's 1851 Traditions and Reminiscences Chiefly of the American Revolution in the South is the original source of Hammond's account.

The Cowpens Battlefield

Below is a topographic map of the Cowpens battlefield and surrounding area. North is at the top of the map. The contour lines represent approximately 20-foot increments (6 meters to be exact). Lighter shaded areas indicate higher elevations.

Elevations on the Cowpens Battlefield.

The map shows the location of three "eminences" associated with the battle. Elevation #1 is where the majority of the fighting took place. Elevation #2 and Elevation #3 are places that have been identified by some authors as the site of the American encampment on the night before the battle and where the American cavalry were stationed during the battle.

The light blue lines represent creeks in the vicinity of the battlefield. The creek in the upper left portion of the map is a part of Buck (or Cudds) Creek. The creek exiting the northern portion of the map is a branch of Suck Creek. The creek exiting the southern portion of the map is a branch of Zekial Creek. The creek in the southwestern corner of the map is Island Creek.

The brown line represents the Green River Road along which the British advanced (marching from the right side of the map).

A comprehensive review of the battlefield, including terrain features, vegetation, roads, and land ownership can be found in The Cowpens Historic Grounds and Resource Study by National Park Service historian Edwin Bearss.

The Coulter's Ferry Road is also included in a number of maps of the battle, but is not shown on this map. Bearss' study suggests that at the time of the battle, it intersected the Green River Road at a point slightly north of this map.

A portion of Bearss' map of the battlefield is visible below. The boxed area roughly corresponds with the area I've modeled.

Excerpt of the Historic Grounds and Resource Study map of the Cowpens Battlefield (click to enlarge).

There is agreement among British and American recollections of the battle that at the time of the battle the area was covered by an "open wood," meaning chiefly that there was little or no underbrush. This would seem to have been the result of human activity. Bearss' review, however, did not uncover evidence of habitation in the immediate vicinity of the battlefield before the beginning of the 19th century.

Bearss offered this explanation for the name of the battle:

"Although at the time the battle was fought, on January 17, 1781, cattle grazed in the area of the battlefield, the pens where the cattle were kept, the habitations where the keeper and cattle hunters lived, the cornfields, the garden, and other improvements were about 'two miles distant.' But as Benjamin F. Perry, a visitor to the site in 1835, wrote, "inasmuch as there was no other or nearer known place in the neighborhood; it is called 'the battle of the Cowpens.'" "

South Carolina militiaman John Whelchel made the same observation in his postwar pension application. According to him, the battle was fought "2 miles above the Cowpens."

Sources:

Edwin Bearss' Cowpens 1974 Historic Grounds and Resource Study (.pdf file).

The pension application of John Whelchel (.pdf file) transcribed by Will Graves.

Saturday, January 10, 2009

Modeling Notes

I'm modeling battles in 1:20 scale. That is, for every 20 participants in the actual battle there will be 1 15mm miniature. The battlefield, likewise undergoes a similar transformation. The formula that I've worked out is as follows.

A "true" 15mm miniature (that is, 15mm from foot to eye) is equivalent to 62 inches in height. (I'm assuming the average soldier was a bit on the short side by contemporary standards).

This means that a 15mm miniature is about 0.009525019 the height of the soldier it represents (62 inches = 1574.8 mm; 15mm/1574.8mm = 0.009525019).

The usefulness of these calculations is that they make it possible to accurately scale distances on the battlefield.

For example, let's say a 100 man battalion were to be deployed as a single rank in close order. In close order the interval between files would be about 15 inches (see this page for a discussion of open and close order). Assuming that a typical soldier was something like 18 inches across the shoulders (I'm assuming that they were on the slender side, too), then each soldier would occupy 33 inches of space, and the battalion would have a frontage of 3,300 inches, or 275 feet.

However, at 1:20 scale with 15mm miniatures this translates into 5 miniatures with a frontage of 1.57 inches (3,300 inches * .009525019 / 20). The picture below provides a visual demonstration, although this "battalion" has a frontage that is slightly too wide because the bases could not be pressed further together.

If the same 100 man battalion were to be deployed as a single rank in open order, then the interval between files would be about 24 inches. Again, assuming that a typical soldier was something like 18 inches across the shoulders, each soldier would occupy 42 inches of space. The battalion, in turn, would have a frontage of 4,200 inches, or 350 feet. At 1:20 scale with 15mm miniatures this translates into 5 miniatures with a frontage of 2.00 inches. The picture below provides a visual demonstration.
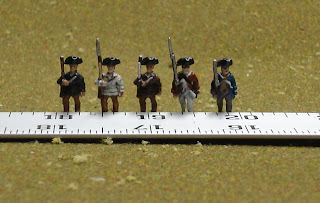
Thursday, January 8, 2009

The Fatal Moment

[Minor edits 12/26/09]

The American victory at Cowpens is often credited to a double envelopment of the British forces (see this map on John Moncure's The Cowpens Staff Ride and Battlefield Tour webpage).

This is not quite how the final stages of the battle are portrayed in some accounts. In addition to the pressure against their outer flanks, there was also a collapse of the middle of the British line.

Lieutenant-Colonel John Eager Howard, who commanded the Continental infantry, wrote that at the climax of the battle: "The enemy were now very near us. Our men commenced a very destructive fire, which they little expected, and a few rounds occasioned great disorder in their ranks. While in this confusion, I ordered a charge with the bayonet, which order was obeyed with great alacrity."

Howard's Continentals charged into the center of the British infantry, breaking their line into two pieces.

Sergeant William Seymour of the Delaware Continentals wrote that when this gap was created, the Continentals advanced and fell upen the flanks of the British to their left and right: "..Captain Kirkwood with his company wheeled to the right and attacked their left flank so vigorously that they were soon repulsed, our men advancing on them so very rapidly that they soon gave way. Our left flank advanced at the same time and repulsed their right flank, upon which they retreated off, leaving us entire masters of the field."

Along with Kirkwood's company, Howard participated in the attack towards the right: “In the pursuit, I was led towards the right, in among the 71 st..."

Major Joseph McJunkin of South Carolina also described these two halves. “One battalion [actually one half of the British line] throws down their arms and the men fall to the earth. Another commences flight, but Washington darts before them with his cavalry and they too ground their arms."

David Stewart's (1825) Sketches... of the Highlanders of Scotland indicated that this break in the center of the line was the primary reason why the 71st Foot, on the left of the British line, was forced to retreat during the battle:

"They [i.e., the 71st] did not immediately fall back, but engaged in some irregular firing, when the American line pushed forward to the right flank of the Highlanders, [the 71st] now realized that there was no prospect of support, and while their number was diminishing that of their foe was increasing. They first wavered, then began to retire, and finally to run. This is said to have been the first instance of a Highland regiment running from an enemy. This repulse struck a panic into those whom they left in the rear [i.e., Tarleton's reserve of British Legion dragoons], and who fled in the greatest confusion. Order and command were lost, and the rout became general. Few of the infantry escaped, and the cavalry saved itself by putting their horses to full speed."

Loyalist Alexander Chesney did not specifically mention the collapse in the center of the British line, but he did confirm that at this point in the battle, the 71st was "unsupported."

It is unclear which British regiment took the brunt of Howard's counterattack. As previously mentioned, Morgan and Tarleton offered different descriptions of how the British units were arrayed. According to Morgan, it was the infantry of the British Legion that were most directly opposed to Howard's Continentals. According to Tarleton, it was the 7th Foot.

Sources:

Tarleton's description of the battle can be found on Marg Baskin's Banastre Tarleton website.

David Stewart (1825). Sketches... of the Highlanders of Scotland.

Morgan's report of the battle can be found in James Graham's (1856) The Life of General Daniel Morgan.

John Moncure's online history of the battle, The Cowpens Staff Ride and Battlefield Tour, includes a transcription of statements by Morgan, Tarleton, Howard, McJunkin, Chesney, and Seymour.

For McJunkin's recollections, see James Saye's Memoirs of Major Joseph McJunkin, Revolutionary Patriot. Also see this issue (.pdf file) of the online newsletter, Southern Campaigns of the American Revolution.

A transcription of William Seymour's journal can also be found on this Battle of Camden website.

Wednesday, January 7, 2009

The British Legion

[Minor edits 12/25/09; 4/13/10]

The British Legion was formed at New York in 1778 from other Provincial units. The term "legion" refers to the fact that the regiment included both an infantry and a cavalry component (specifically, "dragoons"). The Legion also apparently had a band, and, according to Colonel Otho Williams, their instruments were captured at the battle of Cowpens.

The infantry of the Legion usually fought on foot, but detachments were sometimes mounted, most notably at Waxhaws and Hanging Rock. Some of the Legion infantry were apparantly mounted at Cowpens, too, for Tarleton commented that "the cavalry and mounted infantry brought up the rear" during his approach to the battlefield.

The British Legion was one of the most active units during the later years of the war. The regiment (or detachments thereof) saw action at Indian Field in 1778, the siege of Charleston, Lenud's Ferry, Monck's Corner, and Waxhaws in the Spring of 1780, Williamson's Plantation, Rocky Mount, Hanging Rock, Camden, and Fishing Creek in the Summer of 1780, Fishdam Ford, and Blackstock's Plantation in the Fall of 1780, and Cowpens, Torrence's Tavern, Wetzell's Mill , Guilford Courthouse, and Yorktown in 1781.

The many battles in which this regiment participated took a severe toll on the rank and file. Loyalist Alexander Chesney wrote that at the time of Cowpens, the dragoon companies were "filled up from the prisoners taken at the battle of Camden."

The uniform of the dragoons is well documented as short green jackets with black cuffs and collars (see especially this famous painting and Don Troiaini's modern one). The recollections of Cornet James Simons of the American 3rd light dragoons confirmed that this uniform was worn at Cowpens, “Colo. Tarleton's Legeonary Cavalry... wore a Uniform of Green with black facings.” The infantry of the Legion probably wore green jackets as well, although the "Barron Map" of the Battle of Camden shows them in red coats with black facings.

Sources:

Philip R. N. Katcher (1973). Encyclopedia of British, Provincial, and German Army Units 1775-1783. Stackpole Books.

Johann Ewald (1979). Diary of the American War: A Hessian Journal. Translated by Joseph P Tustin. New Haven: Yale University Press.

Lawrence Babits. (1998). A Devil of a Whipping: The Battle of Cowpens (amazon.com link).

The Journal of Alexander Chesney is available here through Google Books.

A summary of the Otho Williams papers can be found here. The item in question is a letter from Williams to Dr. James McHenry, dated January 23, 1781.

Marg Baskin's Banastre Tarleton website is a fantastic resource for Banastre Tarleton and British Legion aficionados.

Mounted Militia

[Minor edits 12/25/09]

My miniatures are "true" 15mm in height, that is, 15mm from foot to eye. There are a number of manufacturers of such miniatures for the American Revolution. None of these manufacturers makes a mounted militiaman figure, which is unfortunate because mounted militia played an important role at a number of battles during the Revolution (e.g., James McCall's and Banjamin Jolly's mounted militia at the battle of Cowpens). Pictured are five versions of a mounted militiaman that I've painted. The figure on the left is an American dragoon by Musket Miniatures riding an Essex horse. Next to him is a Prussian Seven Years War dragoon by Essex. In the middle is a Freikorps mounted infantryman. Next to him on the right is an American cavalryman by Essex. Finally on the right is a Prussian Seven Years War cuirassier by Essex (I filed down the cuirass).

Tuesday, January 6, 2009

British Light Infantry at Cowpens - Part 2

[Minor edits 12/26/09]

Daniel Morgan, writing 2 days after the battle, described the British deployment at Cowpens as follows:

"The enemy drew up in single line of battle, four hundred yards in front of our advanced corps. The first battalion of the 71st regiment was opposed to our right, the 7th regiment to our left, the infantry of the legion to our centre, the light companies on our flanks."

Banastre Tarleton, writing 6 years after the battle, said that: "The light infantry were then ordered to file to the right till they became equal to the flank of the American front line."

So which view is correct? Were the British light infantry divided into two parts and deployed on the flanks of the British line (Morgan's description), or were they grouped into a single battalion and placed on the right of the British line (Tarleton's description)?

I argued that Morgan's report is more reliable, but histories of the battle that specify the position of the British units have followed Tarleton.

It's understandable that historians would assume that Tarleton is correct. After all, who should know more about the deployment of the British troops than the British commander? Furthermore, there is no reason why he should have felt compelled to misstate the facts in this case (unlike his statements about American troop totals and casualties).

Corroboration or refutation of Tarleton's description might be sought in the Strictures of his critic, Lieutenant Roderick Mackenzie, who served with the 71st lights at the battle. Mackenzie does not correct Tarleton on this count, which may be taken as tacit acceptance of his version. However, this does not necessarily settle the metter. Mackenzie sought to destroy Tarleton's reputation chiefly through logical argument, rather than by offering a different remembrance of events.

David Ramsay's early history of the battle states that at the end of the fighting, "The first battalion of the 71st, and two British light infantry companies, laid down their arms to the American militia." Lawrence Babits' modern history suggests (p 197, n. 102) that the two light infantry companies were the light infantry of the 16th Foot and the Prince of Wales' American Regiment; the 71st lights might not have surrendered with them if they had fled from the right flank to join in an attempted rally of the 71st battalion companies on the left flank.

An alternative possibility is that two of the four companies of light infantry were already on the left flank (as per Morgan's after action report, quoted above) and that these two companies surrendered with the battalion companies of the 71st Foot.

Cornet James Simons of the American cavalry recalled participating in a charge late in the battle "on the right wing of their Army Composed of their Legeonary Infantry, intermixed with the Battallion of the Brave 71st." Because other accounts make clear that the 71st Foot was on the British left, not right, Simons seemingly placed the light infantry of the 71st Foot, at least, on the British right flank.

Sources:

Copies of Tarleton's and Mackenzie's description of the battle can be found on Marg Baskin's Banastre Tarleton website.

A transcription of Morgan's report and Simons' statement can be found on John Moncure's online history of the battle, The Cowpens Staff Ride and Battlefield Tour.

David Ramsay (1811). The History of the American Revolution (Vol. 2).

British Light Infantry at Cowpens - Part 1

[Minor edits 12/25/09]

Among the British participants at the Battle of Cowpens was a contingent of light infantry made up of men from three different regiments. These included 41 rank and file of the 16th Foot, 69 rank and file of the 71st Foot (representing both battalions), and around 30 men of the Prince of Wales' American Regiment. The first two numbers come from Cornwallis’ monthly return dated January 15, 1781. This website [link no longer works] on the Prince of Wales American Regiment includes summaries of the service record for each soldier in the regiment, broken down by companies. The records are incomplete, with only one roster available for the period of time near the battle of Cowpens (April, 1781). Based on this information there appears to have been, by my count, two members of the company gravely wounded at the battle and paroled, including the sole officer of the company present at the battle, Ensign Thomas Lindsay. Two sergeants and 17 privates were captured. An additional corporal and 4 privates were attached to Cornwallis' army at the time, and they presumably escaped capture. Three privates disappeared from the roster while the company was in South Carolina; these plausibly could have been killed at the battle. This totals up to a small company of 1 ensign, 2 sergeants, 1 corporal, and 25 privates. Again, though, this is a rough estimation based on a transcription rather than original records. A sizeable number of men from the company are listed as being "on command" in April, 1781. In many cases these assignments appear to have begun long before Cowpens.

Don Troiani’s painting of the men of the 16th Foot at Cowpens shows them in a typical light infantry uniform. The men actually came from three different companies; I don’t know if one of those was the regiment’s light company. In any case, at least some of these men had previously belonged to the regiment’s “hat” companies.

Lieutenant Roderick Mackenzie praised the British light infantry at Cowpens in the following terms:

"The company of the 16th regiment was well known by its services in the army commanded by Major General Prevost; those of the seventy-first regiment were distinguished under Sir James Baird at the surprise of General Wayne in Pennsylvania, of Baylor's dragoons in New Jersey, at Briar Creek in Georgia, at the capture and subsequent defence of Savannah, at the battle near Camden under Earl Cornwallis; and even Lieutenant Colonel did them justice at the [battle of Fishing Creek]. The light infantry company of the Prince of Wales's American regiment, when but newly raised and indifferently disciplined, acquired reputation under General Tryon at Danbury.”

Pictured are miniatures representing the British light infantry at Cowpens. From left to right they are from the 16th Foot, Prince of Wales's American Regiment, and the 71st Foot. The uniform of the 16th lights is based on the Troiani painting mentioned above. The uniform of the PoWAR lights is based on the uniform worn by the member of the light infantry company of the recreated Royal Welsh Fusileers. The uniform of the 71st lights is based on a Troiani painting.

Sources:

Copies of Tarleton's and Mackenzie's descriptions of the battle can be found on John Moncure's online history of the battle, The Cowpens Staff Ride and Battlefield Tour, and Marg Baskin's Banastre Tarleton website.

Michael S. Mallery's Prince of Wales American Regiment webpage contains a wealth of information about that unit. [Link no longer works]

Sunday, January 4, 2009

Tarleton's Description of Cowpens

[Revised 12/25/09]

One of the most influential accounts of the battle of Cowpens is British commander Lieutenant-Colonel Banastre Tarleton's memoirs, published 6 years after the battle. His description is largely consistent with Cornwallis' report, but provides a great deal of additional detail. Whereas Cornwallis differed from Morgan on only a few points (which side had the numerical advantage, how many British casualties were incurred, and when the 71st Foot was added to the fight), Tarleton's account adds additional differences (how the British were deployed during the battle, the timing of a charge by the British cavalry, and the number of American casualties). Interestingly, his description of when the 71st joined the battle is closer to Morgan's report than to Cornwallis.

Tarleton's history includes some demonstrably false statements, including, for example, that "the number of the killed and wounded... amounted to near three hundred on both sides." His account was also clearly written so as to burnish his reputation (e.g., "the disposition was planned with coolness, and executed without embarrassment"). The defeat resulted from "the bravery or good conduct of the Americans, ...the loose manner of forming which had always been practised by the King's troops in America; or ...some unforeseen event, which may throw terror into the most disciplined soldiers, or counteract the best-concerted designs." He also believed that a lack of support from Cornwallis helped turn defeat into disaster.

Tarleton's critic, Lieutenant Rodericak Mackenzie of the 71st Foot, later argued that none of these excuses were adequate and firmly pinned the blame for defeat on Tarleton himself.

The lateness of Tarleton's account, the questionable statements included in it and the questionable motives behind it (the narrative was written at a time when he was becoming increasingly involved in politics) might convince one that it is a good deal less veracious than Morgan's after action report. But in fact Tarleton's description of events has sometimes been given precedence over Morgan's in histories of the battle.

A portion of Tarleton's description appears below:

----------------------------

Lieutenant-colonel Tarleton having attained a position, which he certainly might deep advantageous, on account of the vulnerable situation of the enemy, and the supposed vicinity of the two British corps on the east and west of Broad river, did not hesitate to undertake those measures which the instructions of his commanding officer imposed, and his own judgement, under the present appearances, equally recommended. He ordered the legion dragoons to drive in the militia parties who covered the front, that General Morgan's disposition might be conveniently and distinctly inspected. He discovered that the American commander had formed a front line of about one thousand militia, and had composed his second line and reserve of five hundred continental light infantry, one hundred and twenty of Washington's cavalry, and three hundred back woodsmen. This accurate knowledge being obtained, Tarleton desired the British infantry to disencumber themselves of every thing, except their arms and ammunition: The light infantry were then ordered to file to the right till they became equal to the flank of the American front line: The legion infantry were added to their left; and, under the fire of a three-pounder, this part of the British troops was instructed to advance within three hundred yards of the enemy. This situation being acquired, the 7th regiment was commanded to form upon the left of the legion infantry, and the other three-pounder was given to the right division of the 7th: A captain, with fifty dragoons, was placed on each flank of the corps, who formed the British front line, to protect their own, and threaten the flanks of the enemy: The 1st battalion of the 71st was desired to extend a little to the left of the 7th regiment, and to remain one hundred and fifty yards in the rear. This body of infantry, and near two hundred cavalry, composed the reserve. During the execution of these arrangements, the animation of the officers and the alacrity of the soldiers afforded the most promising assurances of success. The disposition being completed, the front line received orders to advance; a fire from some of the recruits of the 7th regiment was suppressed, and the troops moved on in as good a line as troops could move in open files: The militia, after a short contest, were dislodged, and the British approached the continentals. The fire on both sides was well supported, and produced much slaughter: The cavalry on the right were directed to charge the enemy's left: They executed the order with great gallantry, but were drove back by the fire of the reserve, and by a charge of Colonel Washington's cavalry.

As the contest between the British infantry in the front line and the continentals seemed equally balanced, neither retreating, Lieutenant-colonel Tarleton thought the advance of the 71st into line, and a movement of the cavalry in reserve to threaten the enemy's right flank, would put a victorious period to the action. No time was lost in performing this manoeuvre. The 71st were desired to pass the 7th before they gave their fire, and were directed not to entangle their right flank with the left of the other battalion. The cavalry were ordered to incline to the left, and to form a line, which would embrace the whole of the enemy's right flank. Upon the advance of the 71st, all the infantry again moved on: The continentals and back woodsmen gave ground. The British rushed forwards: An order was dispatched to the cavalry to charge: An unexpected fire at this instant from the Americans, who came about as they were retreating, stopped the British, and threw them into confusion. Exertions to make them advance were useless. The part of the cavalry which had not been engaged fell likewise into disorder, and an unaccountable panic extended itself along the whole line. The Americans, who before thought they had lost the action, taking advantage of the present situation, advanced upon the British troops, and augmented their astonishment. A general flight ensued. Tarleton sent directions to his cavalry to form about four hundred yards to the right of the enemy, in order to check them, whilst he endeavoured to rally the infantry to protect the guns. The cavalry did not comply with the order, and the effort to collect the infantry was ineffectual: Neither promises nor threats could gain their attention; they surrendered or dispersed, and abandoned the guns to the artillery men, who defended them for some time with exemplary resolution. In this last stage of defeat Lieutenant-colonel Tarleton made another struggle to bring his cavalry to the charge. The weight of such an attack might yet retrieve the day, the enemy being much broken by their late rapid advance; but all attempts to restore order, recollection, or courage, proved fruitless. Above two hundred dragoons forsook their leader, and left the field of battle. Fourteen officers and forty horsemen were, however, not unmindful of their own reputation, or the situation of their commanding officer. Colonel Washington's cavalry were charged, and driven back into the continental infantry by this handful of brave men. Another party of the Americans, who had seized upon the baggage of the British troops on the road from the late encampment, were dispersed, and this detachment retired towards Broad river unmolested. On the route Tarleton heard with infinite grief and astonishment, that the main army had not advanced beyond Turkey creek: He therefore directed his course to the south east, in order to reach Hamilton's ford, near the mouth of Bullock creek, whence he might communicate with Earl Cornwallis.

The number of the killed and wounded, in the action at the Cowpens, amounted to near three hundred on both sides, officers and men inclusive: This loss was almost equally shared; but the Americans took two pieces of cannon, the colours of the 7th regiment, and near four hundred prisoners.

Sources:

Copies of Tarleton's and Mackenzie's descriptions of the battle can be found on John Moncure's online history of the battle, The Cowpens Staff Ride and Battlefield Tour, and Marg Baskin's Banastre Tarleton website.