Friday, July 30, 2010

Fort Saint-Jean

War came to Canada soon after the beginning of the American Revolution. On May 17, 1775 (less than 1 month after the inaugural battle at Lexington and Concord), Colonel Benedict Arnold led a raid against British Fort Saint-Jean in southern Quebec, capturing the personnel, boats, and stores located there. Despite this setback, British governor Guy Carleton did not abandon the post. Instead, Fort Saint-Jean was transformed over the summer of 1775 into the most important point of defense for the province of Quebec.

Fort Saint-Jean was situated at a strategic point in the Richelieu-Champlain-Hudson corridor, a traditional invasion route between the American colonies and Canada. Boats launched from Saint-Jean could sail as far south as Skenesborough, deep within the province of New York (cf. New York: May, 1775). However, no large boat could sail north from Saint-Jean because of nearby rapids in the Richelieu River.

The Richelieu River Valley. Fort Saint-Jean is rendered in English on the map as Fort St. John. The upper part of the Richelieu is labelled River Chambly -- a distinction no longer in use. Note that there were two supply routes connecting Fort Saint-Jean to the rest of Canada. Supplies could be sent by water along the Richelieu, or they could be sent overland from La Prairie (near Montréal).

Fort Saint-Jean was originally constructed by the French of earth and wood, but little remained of those fortifications by 1775. Therefore, the British began from scratch, constructing two earthen redoubts along the river, with a wharf between them. This fort was garrisoned by most of the British regulars in Quebec, including the greater part of the 7th and 26th regiments of foot, and a detachment of Royal Artillery. Others serving at the fort included (French) Canadian volunteers and militia, Scottish emigrants, and Native Americans (the Kahnawake Mohawk were nearest).

The new fort and its garrison were first put to the test in early September, 1775, when an American army, led by Major-General Philip Schuyler and Brigadier-General Richard Montgomery, invaded southern Quebec. These commanders found the fort difficult to approach, for aside from its guns and mortars, much of the surrounding countryside was a vast, flat, swampy woods.

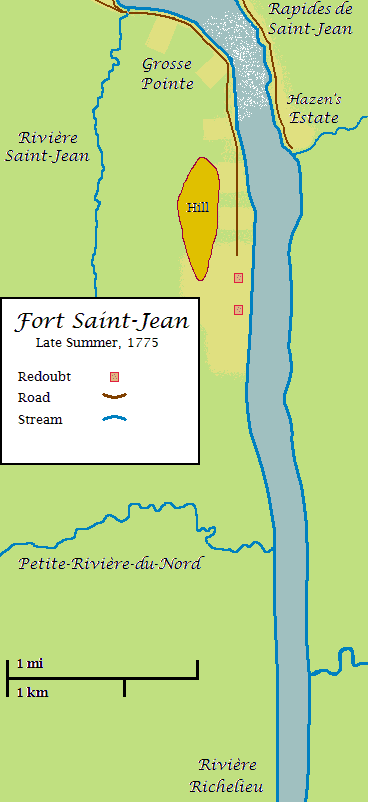
Fort Saint-Jean (click to enlarge). The Americans approached from the south (bottom of the map) via the Richelieu. This map was created by overlaying two early maps of the area on a modern map. The location of the roads and the course of the stream near Hazen's estate are quite approximate. Most difficult to determine was the areas of cleared land (shown on the map in yellow). The approximate dimensions of the cleared area around the redoubts is inferred from several sources. Much less is known about the cleared areas north of the fort; their representation here is speculative. There was likely also some cleared land near Petite-Rivière-du-Nord (at least there was a small house there), but this is not shown for lack of substantive information.

--------------

One of the better descriptions of Fort Saint-Jean appears in the journal of American Major Henry Livingston of the 3rd New York Regiment. He wrote the following (edited to bring the text in line with modern standards for capitalization and punctuation) in an entry dated November 21, 1775:

"The fortress of St. Johns lies near 130 miles north from Ticonderoga on the brink of Lake Champlain and about a quarter of a mile from the first rapid. [Note: Livingston evidently believed that the fort was on an arm of Lake Champlain]. It consists of 2 forts or redoubts near 100 yards asunder. The southern one rather the largest. In this is a brick house containing 2 clever rooms and Lintels back of them-- and a small potash house near it.

"In the north redoubt is a very large white stone house 2 stories high but unfinished within... The forts are about 100 feet wide each way in the inside; and mounted between them, upwards of 30 iron cannon besides brass field pieces (6 pounders) and several mortars.

"The wall is composed altogether of earth, and neatly sodded without, looking as green as the field around it.

"The whole surrounded with a ditch of 7 feet deep and 8 or 9 feet wide--picketed on the interiour side with timbers projecting from under the wall and over the ditch, and a little elevated, with their points made very sharp.

"Between the 2 forts there was a line of pickets placed (or posts) 10 feet high and close together...

"A ditch was also dug deep enough for men to pass unseen thro from one fort to the other, and between the pickets and the lake. Both the pickets and ditch were constructed after we built our eastern battery [i.e., in October, 1775].

"In each redoubt the enemy kept a union [i.e., a flag] displayed.

"It's 2 or 300 yards from the forts to the nearest woods or bushes. In general it's 5 or 600 to the woods--a low plain wet, and covered with excellent grass surrounds the fortress. If there is any elevation of the earth at all, it is where the forts stand.

"The wilderness west of St. Johns is an impassable quagmire--low, wet and covered with timber and brush--and for 7 or 8 miles north [sic, northwest] of the fort we meet with but one sorry log tenement which stood in our grand camp.

"Opposite the forts on the east of the lake the soil is also very wet and low; a perfect howling swamp. There are a considerable number of large hemloc trees [that] grow on this side and plenty of the balm-of-Gilead firs. North east of St. Johns at the distance of about a mile stands a large elegant house belonging to one Captain Hasen [i.e., Moses Hazen] with a considerable quantity of cleared ground around it. The captain has a saw mill standing on the rapids which are just by his house. These rapids are not so great but what rafts of boards and timber can at any time go down them and so into the River St. Lawrence. Our people frequently sent battoes down with cannon in them--and empty ones can be drawn up against the current.

"The fall is perhaps 100 yards in length. The breadth of the lake here as at St. Johns [is] between 3 and 400 yards.

"On the west side of the lake, from St. Johns northward there are settlements all the way to Chamblee [Chambly]; a house or two being in sight of the fort."

Sunday, July 25, 2010

Ramsour’s Mill: The Battlefield in Miniature

An important source of information on the battle of Ramsour’s Mill is Wallace Reinhardt's interview of Adam Reep. Reep was an elderly veteran of the battle; Reinhardt's grandfather owned the land on which the battle was fought. From their discussions, Reinhardt prepared a map of the battle. One version of the map can be found in this report (.pdf); a zoomable version can be found at this website. The linked report includes a figure that shows how the terrain features in the Reep/Reinhardt map approximately correspond with a modern map of the area. Using this assessment, I have prepared my own map, and a miniature model of the battlefield.

Ramsour's Mill Battlefield Map. Water courses are shown in blue, roads are brown, and the outline of a ridge is shown in grey. The greater part of the fighting took place on the southern end of this ridge (i.e., towards the bottom of the map). Key: A) Ramsour's Mill on Clark's Creek; a mill pond is north of the mill. B) Green's Road. C) Tuckaseegee Ford Road. D) Sherrill's Ford Road.

Ramsour's Mill Battlefield in Miniature.

The battlefield was constructed by drawing a grid on the battlefield map, with the lines at 1,000-foot intervals. Then, a comparable grid was drawn onto a piece of white poster board. Because the model is at a 1:20 scale with 15mm-high miniatures, the grid lines were drawn 5.72 inches apart (for the underlying math, see here). Next, I sketched the terrain features onto the poster board, using the grid lines as visual aids, and I punched holes in the poster board for trees. After that, I painted the various terrain features with acrylics, and spread a semi-gloss varnish over Clark's Creek and the mill pond. Then, I doused the wooded and grassy areas with diluted white glue and flocked them with a Woodland Scenics turf blend. Finally, I added trees, bushes, fences, and the mill.

The fence is not a terrain feature shown on the Reep/Reinhardt map. It was included because of comments by Joseph Graham and others suggest the presence of a fence in the approximate area shown.

A number of buildings stood on the battlefield. Most were omitted because, at 1:20 scale, each building is 20 times too long and 20 times too wide, and takes up much of the space occupied by the combatants. I included the mill because it was situated outside the area in which the fighting took place. Not a lot of effort went into it, as it may not appear in the forthcoming images of the fighting. "Ramsour's mill" is the same building I used previously to serve as Hill's Ironworks, but with the addition of a mock water wheel.

Thursday, July 22, 2010

Ramsour's Mill: Joseph Graham's Timeline

Joseph Graham described for historians not only the battle of Ramsour’s Mill itself, but also the sequence of events that led up to it. A summary of those events appears below.
  • May 12, 1780: The American army in the southern theater surrenders to British forces at Charleston, South Carolina.
  • May 29: British Lieutenant-Colonel Banastre Tarleton destroys a force of Virginia troops at Waxhaws, South Carolina, the last force of American regulars in South Carolina.
  • June 7: British Lieutenant-Colonel John Moore of the Royal North Carolina Regiment returns home to Tryon County, North Carolina. “[H]e arrived at his father's... wearing a sword and an old tattered suit of regimentals.” He encourages local Loyalists by bringing news of the capture of Charleston and the advance of British troops into the South Carolina backcountry.
  • June 8: Brigadier-General Griffith Rutherford, of the North Carolina militia, hears that Lieutenant-Colonel Francis Rawdon is leading a column of British troops towards the North Carolina border.
  • June 10: Rutherford’s militia assemble at Reese’s plantation, 18 miles northeast of Charlotte, North Carolina. Rutherford intends to defend the Charlotte area against Rawdon’s advance.
  • June 10: Tryon County Loyalists meet with John Moore at Indian Creek. Moore tells them that the British intend to invade North Carolina in the early fall. In the meantime “they, with all other royal subjects, should hold themselves in readiness [for the British invasion], and in the meantime get in their harvest; that before the getting in of the harvest it would be difficult to procure provisions for the British army, and that as soon as the country could furnish subsistence to the army it would advance into North Carolina and give support to the Royalists.”
  • June 10: Moore learns that Major Joseph McDowell, an American (Whig) militia commander, is 8 miles away and searching for Loyalist leaders. McDowell has only 20 men with him, and Moore decides to attack.
  • June 11: McDowell’s band leaves the area and Moore’s Loyalists cannot overtake them. Moore temporarily sends his men home with the understanding that they will soon reconvene at Ramsour’s Mill in Tryon County.
  • June 12: Griffith Rutherford hears that Francis Rawdon is moving away from the North Carolina border. Rutherford orders his own troops to advance to Mallard’s Creek, 10 miles nearer the border.
  • June 13: 200 Loyalists assemble at Ramsour’s Mill.
  • June 14: Hundreds of additional Loyalists assemble at Ramsour’s Mill. Major Nicolas Welsh of the Royal North Carolina Regiment brings news of the victory at Waxhaws. “He wore a rich suit of regimentals, and exhibited a considerable number of guineas by which he sought to allure some, whilst he endeavored to intimidate others by an account of the success of the British army in all the operations of the South, and the total inability of the Whigs to make further opposition. His conduct had the desired effect, and much more confidence was placed in him than in Colonel Moore.”
  • June 14: Griffith Rutherford creates two elite detachments from the 650 or so militiamen at his disposal. He has 65 men equipped as dragoons and placed under the command of Major William Davie. He also has 100 men designated “light infantry” and placed under the command of Colonel William Davidson.
  • June 14: Rutherford learns that Loyalists are organizing in Tryon County, 40 miles to the northwest. He orders Francis Locke of Rowan County, Major Davie Wilson of Mecklenburg County, and other officers, to raise as many men as they can to counter this threat.
  • June 15: Rutherford advances two miles to the south of Charlotte: closer yet to the border with South Carolina.
  • June 17: Rutherford learns that Francis Rawdon's column has retired to Camden, South Carolina. It is now clear to Rutherford that the British will not soon invade his state. At the same time Rutherford learns that the Tryon County Loyalists are at Ramsour’s Mill.
  • June 18: Rutherford marches his men to Tuckaseegee Ford on the Catawba River, which is only 12 miles from Ramsour’s Mill. He requests Francis Locke to bring his forces to Tuckaseegee Ford.
  • June 18: Davie Wilson, with 65 men, crosses Tool’s Ford and joins Joseph McDowell, who has 25 men. At McEwen’s Ford they are joined by Captain Gilbraith Falls with 40 men. The combined force marches up the east side of Mountain Creek.
  • June 19: It rains in the morning. Rutherford’s men discharge their guns, which alarms the neighborhood. When some of the local men turn out to investigate, they join Rutherford’s command. Rutherford’s command spends the night in a camp 16 miles from Ramsour’s Mill.
  • June 19: Wilson, McDowell, and Falls join forces with Francis Locke. Their combined force has approximately 400 men. Locke and his fellow officers are at Mountain Creek, 16 miles from Ramsour’s Mill. They do not receive Rutherford’s request to move to Tuckaseegee Ford. They decide that it is safer for the men’s families to remain in the area than it is to join Rutherford (who they believe is still near Charlotte). They also reason that it is safer to attack the Loyalists than it is to remain in one place. Although the Loyalists are more numerous, they are not expecting an attack. Locke (the senior officer) sends a messenger to Rutherford relaying this decision. His men make a night march in order to surprise the Loyalists early the next morning.
  • June 19/June 20: Locke and his fellow officers are on the road to Ramsour's Mill. During a halt, “the officers convened to determine on the plan of attack. It was agreed that the companies commanded by Captains Falls, M’Dowell and Brandon should act on horseback and go in front. No other arrangements were made, and it was left to the officers to be governed by circumstances after they should reach the enemy. They resumed their march and arrived within a mile of the enemy's camp at daybreak.”
  • June 20: There are now perhaps as many as 1300 Loyalists at or near Ramsour’s Mill, but ¼ of these are without arms. Rutherford receives Locke’s message and marches his men to Ramsour’s Mill. Rutherford's command is miles from the battlefield at the time Locke's men make their attack.

Comment: Graham is not an infallible source, and some of the above-listed dates may be in error. For example, Graham claimed that the battle of Hill’s Ironworks took place on July 9, when there is clear evidence that the battle was on either June 17 or June 18.

Saturday, July 17, 2010

New Research on Cowpens

Recently, I’ve come across new evidence about how the British force was deployed at the onset of the fateful battle of Cowpens. This evidence has convinced me that the deployment that I described last year (and which is the same as appears in histories of the battle) is likely in error.

To the best of my knowledge, every published description of the British deployment at Cowpens has followed Lieutenant-Colonel Banastre Tarleton’s account. None have suggested there is reason to doubt the accuracy of his description. Consider the weight of evidence described below and ask yourself a) whether the question of how the British deployed should be regarded as settled, and b) whether Tarleton’s description is most likely the correct one.

Below is a listing of the earliest descriptions of the British deployment at Cowpens, followed by two different representations of the deployment in miniature.

Lieutenant Harry Calvert, on or shortly after January 17, 1781:

Comments: Calvert was not present at the battle but he evidently spoke with men that had been present, and he summarized their discussion in his journal. Mark Urban summarized Calvert's take on Cowpens in Fusiliers: The Saga of a British Redcoat Regiment in the American Revolution. According to Urban:

"As one fugitive after another wandered into the British camp, Calvert pierced together the story of what had gone wrong. Tarleton, as was his custom, had hurled his troops into action before they were all up, and the 71st had advanced towards their enemy, taking significant losses from enemy sharpshooters as they went" (p 226).

Lieutenant-General Charles Cornwallis, January 18, 1781:

Comments: Cornwallis was not present at the battle but he spoke with Tarleton shortly afterward. Cornwallis briefly summarized the British deployment in a letter to his superior, Lieutenant-General Henry Clinton. He did not describe the relative positioning of the various units aside from identifying them with a front line or with a reserve.

“The attack was begun by the first Line of Infantry, consisting of the 7th Regiment, the Infantry of the Legion & Corps of Light Infantry annexed to it; & Troop of Cavalry was placed on each Flank: the 1st Battalion of the 71st, and the Remainder of the Cavalry, formed the reserve.”

Brigadier-General Daniel Morgan, January 19, 1781:

Comments: Morgan was an eyewitness writing about the event shortly afterwards. He reportedly rode up to the front line before the battle began where (presumably) he could clearly observe how the British were deploying. Because a number of British officers were later made prisoners, he also had the opportunity to question them at length about their numbers, battle plan, etc. The following passage is from his official report of the battle.

“The enemy drew up in single line of battle, four hundred yards in front of our advanced corps. The first battalion of the 71st regiment was opposed to our right, the 7th regiment to our left, the infantry of the legion to our centre, the light companies on our flanks. In front moved two pieces of artillery. Lieut. Col. Tarleton, with his cavalry, was posted in the rear of the line.”

Major Carl Leopold Baurmeister, February 21, 1781:

Comments: Baurmeister was not present at Cowpens, but he recorded a description of the battle in his journal. Apparently, one or more paroled British officers that had returned to Charleston, South Carolina, described the battle to James Wemyss, a major in the 63rd Foot. Wemyss, who was recuperating from a wound, soon after departed for New York where he described his second-hand information to officers there. In this way, Baurmeister learned of the battle. Baurmeister’s description of the British deployment is strikingly similar to that in Morgan’s report. However, Wemyss’ description, rather than Morgan’s report, seems to have been the source of Baurmeister’s description. Baurmeister’s account shows a poor understanding of the American side of the battle. For example, Baurmeister wrote that it was the "the Georgia volunteers" that broke the British line and captured the cannon; he made no mention of the Maryland and Delaware Continentals. This is the kind of error that might be expected if Baurmeister got his information from Wemyss, who in turn got it from an officer in the battle -- not the kind of error that would occur if Baurmeister was restating Morgan’s published report. Baurmeister's description of the British deployment also differs from Morgan's in several minor respects.

“Believing that he had forced General Morgan to retreat and that his force was superior to the rebels', he [Tarleton] went in search of General Morgan on the 17th of January. He found him in battle formation at the Cowpens, close to the Pacolet River. Colonel Tarleton had to defend himself as well as he could in a space of four hundred yards. He posted the 7th Regiment on his right, the 1st Battalion of the 71st on his left, and the dismounted Legion in the center. His dragoons covered the flanks… in front of the left wing of the 7th Regiment he had two light fieldpieces.

“The British attack was too furious for the enemy's right wing—nothing withstood the 1st Battalion of the 71st Regiment….”

Lieutenant-Colonel Banastre Tarleton, 1787:

Comments: Tarleton issued the orders for the British deployment and observed their execution. He wrote about the event approximately 6 years later in his history of the southern campaign of the American Revolution.

“Tarleton desired the British infantry to disencumber themselves of every thing, except their arms and ammunition: The light infantry were then ordered to file to the right till they became equal to the flank of the American front line: The legion infantry were added to their left; and, under the fire of a three-pounder, this part of the British troops was instructed to advance within three hundred yards of the enemy. This situation. being acquired, the 7th regiment was commanded to form upon the left of the legion infantry, and the other three-pounder was given to the right division of the 7th: A captain, with fifty dragoons, was placed on each flank of the corps, who formed the British front line, to protect their own, and threaten the flanks of the enemy: The 1st battalion of the 71st was desired to extend a little to the left of the 7th regiment, and to remain one hundred and fifty yards in the rear. This body of infantry, and near two hundred cavalry, composed the reserve.”

--------------

Two different conceptions of the British deployment at Cowpens appear below. (For information on the deployment of American forces in the background, see The Militia Line at Cowpens, The Main Line at Cowpens: Organization, The Americans Deploy). Each miniature represents approximately 20 combatants. The two British guns are represented by a single piece. Per Tarleton's account (and what was likely standard practice), the infantry are in open order [cf. Modeling Notes]. The flags are carried by the 7th Foot; the British Legion infantry is clothed in green [cf. British Legion Redux]. Not all of the British Legion dragoons can be seen in these images.

Banastre Tarleton's Description of the British Deployment at Cowpens. The front line consists of (from left to right), a troop of dragoons, the 7th Foot, a contingent of Royal Artillery, the British Legion infantry, a contingent of light infantry, and a troop of dragoons. The 71st Foot and the greater part of the British Legion dragoons are in reserve.

Alternative Conception of the British Deployment at Cowpens. The British line is anchored on either end by a troops of dragoons (Baurmeister, Tarleton). The 71st Foot is on the left of the British line where it is close enough to the front to participate in the attack on the American militia (Calvert, Morgan, Baurmeister), but far enough from the front where it can be called accurately a reserve (Cornwallis, Tarleton). With the 71st is part of the light infantry (Morgan). The center of the line consists of the British Legion infantry (Morgan, Baurmeister), and the right consists of the 7th Foot (Morgan, Baurmeister), supported by the remainder of the light infantry (Morgan). A contingent of Royal Artillery is in advance of the infantry (Morgan, Baurmeister). The greater part of the British Legion dragoons are in reserve (Cornwallis, Morgan, Baurmeister, Tarleton).

Monday, July 12, 2010

Ramsour’s Mill: Joseph Graham Clarifies

Early histories of the southern campaign of the American Revolution said little about the battle of Ramsour’s Mill. In 1820, Joseph Graham, then an aged veteran, sought to set straight the historical record.

Joseph Graham first saw military service during the American Revolution with the 4th North Carolina regiment. He began active duty late in 1778, and was discharged 9 months later. During that time he served primarily as quartermaster sergeant and he was present at the battle of Stono Ferry (June 20, 1779). The North Carolina Continentals were captured en masse with the surrender of Charleston, South Carolina (May 12, 1780), and so when Graham returned to the field it was with the Mecklenburg, North Carolina, militia regiment. Graham was appointed regimental adjutant. The Mecklenburg militia (including Graham) largely missed participating in the battle of Ramsour’s Mill (June 20, 1780); however, they were engaged at Rocky Mount (July 30, 1780) and Hanging Rock (August 6, 1780). When the British invaded North Carolina in September, 1780, Graham commanded a volunteer force at Charlotte (September 26), where he fought with distinction and was badly wounded. At the end of the year he was appointed captain of a company of militia dragoons, and Graham led these men at Cowan’s Ford (February 1, 1781), Hart’s Mill (February 17, 1781), Pyle’s Defeat (February 17, 1781), Clapp’s Mill (March 4, 1781), and Weitzel’s Mill (March 6, 1781). In the Fall, he was promoted to major and led detachments at Raft Swamp (October 15, 1781), and More’s Plantation (November 14, 1781). Graham also served during the War of 1812, as brigadier-general commanding a force of North and South Carolina militia.

Joseph Graham, late in life.

Joseph Graham did not attempt to write his own history of the southern campaign, but rather wished to furnish material for those who would. In a letter to Colonel Charles Conner (dated November 27, 1820), he noted:

“I have a great number of loose sheets in continuation if properly connected and corrected, in my opinion would be interesting and voluminous, not a regular History of the war in this section of Country but rather a Supplement to the Histories of [John] Marshall, Ramsey [David Ramsay] and [Henry] Lee; some things omitted by them entirely, others inaccurately described and others where well described incidents are omitted which are worthy of being preserved, especially where the men of what was then Mecklenburg [County] and Rowan [County] were concerned… I will be responsible and furnish the facts; if you and a partner will furnish the arrangement and language…” [1]

Connor soon shared Graham’s written material with Judge Archibald Murphey, who was then working on a history of North Carolina. Murphey gushed to Graham (letter dated January 10, 1821), “Col. Connor delivered to me in Raleigh, your account of the battle at Ramsour’s, which I have read with much interest, for it was the first time I had any correct idea of that affair. I have the account in my possession, and will shortly give it to the public.”

Murphey soon submitted the account to the Hillsborough Register.

Later that year, Graham wrote to Murphey (letter dated October 8, 1821) about the reception this account received:

“Since the printers furnished me with an account of the Battles of Ramsour’s it has been examined by 8 or 10 persons who were in that affair, they all admit of the correctness and being circumstances to their recollection which they had forgotten.”

That same year, Graham sent Murphey accounts of Rocky Mount, Hanging Rock, and other engagements that had received little attention from the early historians. [2]

Coming soon: Graham's account of the battle of Ramsour's Mill.

---------------
Note 1: Graham echoed this complaint in a later letter to Archibald Murphey, writing:

“In the Histories of the Revolutionary War by Marshall, Ramsey & Lee the details given of transactions in this Section of Country [i.e., the Carolinas] are frequently inaccurate and several things which had a bearing on the general result entirely omitted. They had not the means of correct information, except Lee who did not join the Southern Army with his Legion until the month of February, 1781, after which his narrative may be generally relied on.

“It may be remarked that… of all the battles fought in the South, there were not more than three or four official reports ever published. The Historians had to collect some of their information from common fame and other precarious sources. The truth is that many of the officers of that time were better at fighting than writing and could make better marks with their swords than with their pens. Their object did not appear so much to have their names puff’d in the columns of a news paper as to destroy their Enemy or drive him from their Country and Establish its Independence…”

Note 2: Graham’s letters do not make clear how he obtained his information. His comments in the note above suggest that he relied neither on written accounts by others, nor on common knowledge. He visited the battlefield not long after the fighting ended, and his memory for what he saw and heard was likely one source.

Graham wrote to Murphey, “For the truth of the facts he states he appeals to those who were present on the several occasions related, of whom it is believed more than 100 are yet living.” This comment implies that Graham had also discussed the battle with some number of surviving participants in later years and that he had reason to believe that his understanding of Ramsour’s Mill was consistent with the recollections of others.

Tuesday, July 6, 2010

Ramsour’s Mill in Early Histories of the War

As described previously, the battle of Ramsour’s Mill was seldom mentioned in surviving correspondence from the summer of 1780. Nevertheless, the battle did not escape the notice of early chroniclers of the war.

Below is a selection of passages referring to the battle in some of the earliest works on the war. Common themes in these works is that a force of Loyalists organized in North Carolina in June, 1780, and that this force was soon attacked and dispersed by the Americans (Whigs). Few details about where or how the Loyalists were defeated were available to the authors of these accounts.

Charles Stedman. (1794). The History of the Origin, Progress, and Termination of the American War, Vol. 2.

Comments: Charles Stedman was a British officer who served in the southern theater (but not at Ramsour's Mill). In his account, the North Carolina Loyalists under John Moore rose up in anticipation of a British invasion of their colony. However, the "insurrection" was premature and Moore's force was dispersed by Griffith Rutherford.

“A correspondence had been kept up with the loyalists in North Carolina: And, as the expedition into that province was necessarily delayed, his lordship [Lieutenant-General Charles Cornwallis] sent emissaries amongst them to request the well affectect to attend to their harvest, collect provisions, and remain quiet till the king's troops were ready to enter the province, which would not be till the end of August, or beginning of September. But, unfortunately, this prudent and necessary admonition was not attended to. A number of loyalists in Tryon County having prematurely assembled in arms under a colonel More [Lieutenant-Colonel John Moore], towards the end of June, were quickly routed and dispersed by a provincial force under general Rutherford [i.e., Brigadier-General Griffith Rutherford]. This unsuccessful insurrection furnished a pretence for persecuting the loyalists in other parts of the province their gaols were filled with loyalists, and every day added a victim to their gibbets.”

William Gordon. (1801). The History of the Rise, Progress, and Establishment of the United States of America, Vol 3.

Comments: Reverend William Gordon of Roxbury, Massachusetts, was an avid chronicler of the war. His account provided additional detail as to how Moore's Loyalists were dispersed by the American Whigs. He noted that it was Francis Locke, not Griffith Rutherford, that commanded the American force that fought Moore, that Locke's men were greatly outnumbered, that a charge by a party of mounted Americans threw the Loyalists into confusion, and that the battle ended when the Loyalists fled during a temporary cease-fire.

“A large body of them [i.e., Loyalists] collected under the command of col. Moore, in North-Carolina, on the 22d of June. The greatest part had taken the oath of allegiance to that state, and many had done militia duty in the American service. Their premature insurrection... subjected them to an immediate dispersion. Gen. Rutherford instantly marched against these insurgents, but was so short of lead that he could arm only 300 men. Col. Lock [i.e., Colonel Francis Locke] advanced with this detachment twenty-five miles a-head to observe them, while the main body halted for a supply of ammunition. The colonel, though greatly inferior in force, was reduced to the necessity of attacking or being attacked. He chose the former; and capt. Falls [Captain Gilbraith Falls], with a party of horse, rushed into the middle of the royalists, and threw them into confusion. Twenty-two of the whig militia were killed or wounded; among the former were six of their officers, who were singled out by riflemen among the insurgents. The captain was one of the slain. Col. Moore proposed to col. Lock a cessation of all hostilities for an hour, which being agreed to, the former ran off with his whole party.”

David Ramsay (1811). The History of the American Revolution, Vol. 2.

Comments: David Ramsay was a South Carolina doctor turned delegate to the Continental Congress, and later, historian of the war. Ramsay was captured when the British took Charleston in May, 1780. He was imprisoned at the time of Ramsour's Mill.

“The precautions taken to prevent the rising of the royalists in North-Carolina, did not answer the end. Several of the inhabitants of Tryon county, under the direction of Col. Moore took up arms, and were in a few days defeated by the whig militia, commanded by Gen. Rutherford.”

Henry Lee. (1812). Memoirs of the War in the Southern Department of the United States.

Comments: Henry Lee fought in the southern theater of the war as a lieutenant-colonel commanding an American partisan corps. He and his corps arrived in the southern theater months after the battle of Ramsour's Mill. His account appears to have been based on that of William Gordon, described above. Lee, however, named the site of the battle (although it is misspelled).

“A large body of loyalists collected under colonel Moore at Armsaour's [sic] mill on the 22d of June; among whom were many who had not only taken the oath of allegiance to the state, but had served in arms against the British army. Rutherford lost no time in taking his measures to bring Moore to submission. But so destitute was he of ammunition that only three hundred men could be prepared for the field. This detachment was intrusted to colonel Locke, who was ordered to approach the enemy and watch his motions, while Rutherford continued to exert himself in procuring arms for the main body to follow under his own direction.

“Moore, finding an inferior force near to him, determined to attack it, in which decision he was gallantly anticipated by Locke, who, perceiving the enemy's purpose, and knowing the hazard of retreat, fell upon Moore in his camp. Captain Falls with the horse, led, and rushing suddenly, sword in hand, into the midst of the insurgents, threw them into confusion which advantage Locke pressed forward to improve, when he suspended the falling blow in consequence of colonel Moore proposing a truce for an hour with the view of amicable adjustment. During the negotiation, Moore and his associates dispersed, which appears to have been their sole object in proposing the suspension of hostilities.”

Friday, July 2, 2010

Ramsour’s Mill: Initial Descriptions

Despite the fact that Ramsour's Mill appears to have been a crucial American victory – even a turning point, in the southern theater – the battle is little discussed in correspondence from that time.

Consider three letters written shortly after the battle: North Carolina governor Abner Nash to Virginia governor Thomas Jefferson on June 25, James Monroe to Thomas Jefferson on June 26, and Major-General Johann de Kalb to General George Washington on June 29.

Nash and Monroe referred to a brigade of North Carolina militia commanded by Brigadier-General Griffith Rutherford, but provided no hint that some of Rutherford’s men have won a victory at Ramsour’s Mill. In fact, their letters do not even suggest that there was significant Loyalist opposition in that part of the state. The letter by de Kalb is the only one of the three to refer to a Loyalist threat: he mentioned to Washington that a detachment of his men were in Guilford County helping the local militia defend themselves against their Loyalist counterparts. It’s unclear whether de Kalb was even aware of Rutherford’s force. Although he complained that “I am quite in the dark as to all eternal News from the South as well as from the East,” Rutherford’s force to the west was missing from a report he gave of American forces in the state.

Nash, Monroe, and de Kalb agreed on one thing: the main problem facing the Americans was a lack of provisions. Monroe noted that because of a lack of provisions, “…the Army under General de Kalb at Hillsboro, and that under General Caswell here [Cross Creek], are no longer able to hold those Stations and are in that dilemma, that they have only the alternative of advancing shortly on the Enemy or retiring to Virginia.” De Kalb complained that “We live from hand to mouth, and get very little, but what is collected by Detachments, and brought in with our Baggage Waggons [from] the Scatter’d few farms in this part…” As a consequence he was forced to put his men on reduced rations. [for a map of American dispositions, see here].

Perhaps the earliest written record of the battle of Ramsour’s Mill appears in the journal of Anthony Allaire, a lieutenant with the American Volunteers. On June 23 (i.e., 3 days afterwards), he wrote:

“Lay in the field at Ninety-Six [South Carolina]. Some friends came in, four were wounded. The militia had embodied at Tuckasegie [Tuckasegee], on the South Fork of Catawba river-were attacked by a party of Rebels, under command of Gen. [Griffith] Rutherford. The [Loyalist] militia were scant of ammunition, which obliged them to retreat. They were obliged to swim the river at a mill dam. The Rebels fired on them and killed thirty. Col. [Patrick] Ferguson, with forty American Volunteers, pushed with all speed in pursuit of the Rebels. It is seventy miles distance from Ninety-Six. The militia are flocking to him [i.e., Ferguson] from all parts of the country.”

It was not until July that American authorities referred to the victory in their correspondence. In a July 4 letter, South Carolina militia Colonel James Williams wrote that the Loyalists had 1,300 men at Ramsour’s Mill, that 35 were killed, and that 500 horses and all of their baggage had been taken. On July 23, North Carolina militia Major Thomas Blount claimed that the Loyalists had 70 men killed, 100 taken prisoners, and lost 300 horses and all of their baggage. Blount also claimed that the Americans lost a mere 7 killed and 19 wounded.

On the British side, Lieutenant-General Charles Cornwallis, did not refer to the battle in his correspondence with London until August 20, when he wrote:

“[O]ur Friends in Tryon County, North Carolina, in the latter end of June, who, having assembled without concert, plan, or proper leaders, were, two days, after, surprised and totally routed by the Son of Genl. Rutherford. Many of them fled into this Province, where their reports tended much to terrify our friends and encourage our enemies.”

Cornwallis perhaps chose to withhold this information until he could also report on positive developments. In this case, news of the defeat in North Carolina was accompanied by news of the British victories at Camden and Fishing Creek.

Note: Of course one's conclusions depend on the sources. In this case I searched the Colonial and State Records of North Carolina, the Thomas Jefferson papers, the George Washington papers, and the records of the Continental Congress. Additional mentions of the battle may have been found were I able to search newspaper articles from that time.

Thursday, July 1, 2010

Making History: Ramsour's Mill

Making History: Ramsour's Mill
Introduction

Forgotten Turning Point?

From 1775 through 1777, the outcome of the American Revolution seemed contingent on events in New England, New York, New Jersey, and Pennsylvania. Beginning in 1778, however, a stalemate developed in the northern colonies. The British had too few men and too little popular support to hold onto large swaths of territory. Most of their forces were located in or around New York City. The American army had become increasingly professionalized, but it was not yet able to drive the British army from its remaining strongholds. The stalemate led to a shift in the conflict with the southern colonies becoming the focal point of the fighting. The British overran the state of Georgia in 1779, captured Charleston, South Carolina in May, 1780, and shortly thereafter took control of the South Carolina countryside. British fortunes, however, began to wane thereafter, and eventually the southern states were fully restored to the United States.

The turning point in the south is usually regarded as the October, 1780, battle of King’s Mountain, in South Carolina. There, a sizeable British force (primarily consisting of Loyalist militia), was completely destroyed. The British army had its greatest victories before King’s Mountain (e.g., Charleston, Camden) and its worse defeats afterwards (e.g., Cowpens, Yorktown). However, it can be argued that the true turning point in the south was the first moment that British fortunes began to decrease. As noted in a previous series of posts, this happened fairly soon after the capture of Charleston. I noted that the great British victories at Camden and Fishing Creek in August, 1780, failed to restore the British to the same position of strength that they had in June of that year.

So when did British fortunes peak and when did they first begin to decline? Arguably, the peak occurred on June 18, 1780, when the British won a minor battle at Hill’s Ironworks in South Carolina. At this engagement, the British defeated the last band of organized American resistance in South Carolina, seemingly completing their conquest of the state. Arguably the decline began on June 20, 1780 when a large force of Loyalist militia was defeated at Ramsour’s Mill in North Carolina. This defeat led to a complete collapse of Loyalist strength in North Carolina. The defeat of these Loyalist forces greatly reduced the probable success of a British invasion of North Carolina, and helped permit American forces to renew the contest for South Carolina.

In covering this battle, I will describe what different people have had to say about Ramsour’s Mill and how those descriptions have changed over the years. Then, I will illustrate the various phases in the fighting using 15mm-high military miniatures.

[Links will be added to this post as this series progresses; because I will be posting on other topics as well, my best guess is that this series will wrap up in the early Fall].

Posts in this Series:

North Carolina: June, 1780

Ramsour’s Mill: Initial Descriptions

Ramsour’s Mill in Early Histories of the War

Ramsour’s Mill: Joseph Graham Clarifies

Ramsour's Mill: Joseph Graham's Timeline

Ramsour’s Mill: The Battlefield in Miniature

Joseph Graham Describes Ramsour’s Mill (1)

Joseph Graham Describes Ramsour’s Mill (2)

Joseph Graham Describes Ramsour’s Mill (3)

Joseph Graham Describes Ramsour’s Mill (4)

Ramsour’s Mill: 19th Century Reminiscences and Lore

Concluding Thoughts on Ramsour’s Mill