Showing posts with label painting. Show all posts

Tuesday, June 14, 2011

Painting Update: Regiment von Bose

For the past several months, I've been working on battle of Guilford Courthouse project, in which I plan to depict the battle in miniature. Some time ago I finished assembling the American army. Now I'm just about finished with the British army, too. The last unit that I've had to paint is Hessian Regiment von Bose. This regiment was one of two British units embroiled in the “separate battle” at Guilford Courthouse.

A few of the figures below need some touch up work. The figures also need to be varnished and the stands need to be flocked. Otherwise, this is a completed unit.

The figures, by the way, are from Essex Miniatures' Prussian 7 Years War line. The uniform details are more-or-less appropriate for Revolutionary War Hessians. The flags are metal and part of the flag bearer figures.

15mm Miniatures by Essex (click to enlarge).

Regiment von Bose has been popular among those painting miniatures for this time period. Check out the 28mm-high versions of the regiment painted by Giles, Truls, and Steve.

Monday, May 16, 2011

Preparing the Diorama (4)

The last time I wrote about the Guilford Courthouse diorama, I had finished making the ridges and ravines on the western half of the battlefield (these were constructed from pieces of foam board covered with Woodland Scenics' ReadyGrass Vinyl Mat).

Since then, I've made the streams and road in this area, and I've started on the fields.

To make the streams I used a nail to scrape away the grass, painted the cleared area with a brownish-blue acrylic mix, and finally dabbed the painted area with a glossy varnish.

For the road, I used a nail to mark the edges of the road, then dabbed the path with a wet cotton swab, then scrapped the grass away with a flathead screwdriver (it came off with remarkable ease), and then painted the cleared area with a brown acrylic.

Creating the New Garden Road. In the foreground is the raw surface of the vinyl mat after the grass has been scrapped away.

The grass on the mats comes off almost too easily. One can see in the above picture how it has flaked off along the edges of the foam board pieces. I ended up dabbing all the edges with brown acrylic to cover up the problem and hopefully prevent its spread.

Finally, for the fields I've begun cutting out pieces of corduroy and placing them on the American first line. At this point, I placed some minis on the model battlefield. Below part of the North Carolina militia and an American 6-pounder square off against the 71st Regiment of Foot. They won't stay there very long. The fields need yet to be glued down, ringed by fences, and surrounded by model woodland.

Saturday, April 23, 2011

Preparing the Diorama (3)

Progress on my model of the Guilford Courthouse battlefield has been slow but steady. In brief, the model battlefield is intended to be a sort of hybrid between the kind of set-up used in wargames and a traditional diorama. The figures will not be static, and to accommodate their movement, ridges and ravines are being made of a series of tiers (rather than actual slopes). However, the contours of the landscape, and the dimensions of the fields and woods will closely match that of the historical site (see here).

Previously I noted when I had begun to create the foam board tiers and cover them with grass matting.

The basic steps have been: 1) cut out the terrain pieces, 2) paint with a brown acrylic the edges of each foam board tier and the outline of the area on which it is placed, 3) place the foam board tier on the grass mat (I'm using a Woodland Scenics product) and cut out a shape that matches the tier, and 4) glue the grass mat section to the tier.

I have yet to place the many trees that covered the battlefield, but this will be a relatively easy task. The next major challenge will be to represent the streams, roads, and fields. Frankly, I'm not sure how to proceed, and suggestions are welcome. As the streams are small, my thought is to trace the course of the streams on the grass, then scrape away some of the grass and paint the cleared area a pale brown. Next I would glue small stones and bits of brush along the stream. Likewise, the best idea I've had for the roads is to scrape away some of the grass and paint the cleared path some kind of brown. As for the fields, I'm planning on gluing onto the battlefield squares of some brown corduroy material.

Saturday, April 16, 2011

Preparing the Diorama (2)

Some more progress has been made on the battle of Guilford Courthouse diorama, although it is still far from completion.

The last time I wrote about this I had begun cutting out pieces from terrain from foam board. That stage is now complete. Now, I am working on painting the edges of the foam board pieces with brown acrylic paint. This looks like it will be the most time consuming stage. The foam edges are irregular and it is difficult to get the paint into every crevasse. The next stage is to mount grass and trees onto the pieces. After that I plan to create the roads and fields on the battlefield.

I also started to complete a hill in the southwest corner of the battlefield to get a better sense of how the battlefield will look when it's complete. The 1st battalion of Guards (~180 officers and men) was placed in a reserve position on the slope of this hill when the battle started. Later the 1st Guards was brought up to extend the right end of the advancing British line and became heavily engaged with American riflemen and Continentals.

Diorama in Progress (click to enlarge)

Saturday, February 26, 2011

Almost There

For some weeks I've been making preparations for a new major project. Mainly these preparations have involved painting some new regiments of miniatures. I've been trying to complete five new regiments, and I'm now about 3/4 of the way through that task.

One of the units that is now complete is the 2nd Maryland Regiment. Half the figures are by Minifigs, the other half are by Jeff Valent miniatures. The figures are fairly compatible --for example, cartridge boxes and cocked hats are of about equivalent dimensions. However, the Minifigs are more robust, and these figures' muskets (especially the bayonets) are noticeably larger. I may yet trim back the Minifigs' bayonets to reduce the differences.

2nd Maryland Regiment

One of the other units I’m currently working on is Lee’s Legion. The figures were painted green based on a comment their commander (Henry Lee) made about their uniforms while they served in the northern theater. The figures are dismounted dragoons by Freikorps and Peter Pig Miniatures, but I will be using them to represent Lee’s infantry companies. They are such lovely metal figures that I had to find some use for them.

Lee's Legion Infantry (work in progress).

This unit is thought to have changed to light-colored coats with green facings late in the war, as evidenced by the following portrait of Lieutenant-Colonel Henry Lee.

Henry Lee

When I started painting the figures I was working under the assumption that the green uniforms were in use for most of the time the regiment was in service. Then I recently read the following description of Lee’s men in John Robert Shaw’s memoir. Shaw was a soldier in the British 33rd Regiment, and he was captured by some of Lee’s men in early March, 1781.

He wrote:

“Scarcely had we gone half way up the lane, when seven of Lee’s light horse made their appearance: my companion swore there was Tarleton’s light horse coming, and, says he, ‘we shall be taken up on suspicion of plundering, and get 500 lashes a piece.’ ‘No;’ said I, upon observing their brown coats, and white cockades, ‘no, friend, you are deceived; these must be the rebels.’ Having therefore discovered his mistake, he began to cry;--but for my part, I thought it very good fortune.—As they were advancing towards us, we concluded to go and meet them; which we accordingly did, and falling on our knees begged for quarter; which they granted us…” [1]

Based on this description, I think I will repaint the units' coats a whitish brown. [2] It's an annoyance to catch this only when the figures were so close to completion, but better now, I suppose, than after the figures are varnished.

Notes:

1. Source: The Life and Travels of John Robert Shaw (1807/1930).

Also on the subject of clothing, Shaw wrote that after he was captured, a rifle officer ordered Shaw and his companion to strip: “…the officer drew his sword and swore, if we did not comply, he would run us through. So they took our clothes, not leaving us even our leggings or shoes; and God knows, they wanted them badly; for such ragged mortals I never saw in my life before, to pass under the character of soldiers.”

2. The description, of course, applies to the mounted portion of Lee’s Legion. To the best of my knowledge, it’s uncertain whether Lee’s infantry also adopted this look, or wore blue coats, like other Continental infantry, or wore something else entirely.

Saturday, February 5, 2011

Painting Minifigs Riflemen

I always enjoy reading about how others paint their miniatures, and although I am not the most skillful of painters, I thought I would devote a post to describing my process.

In this post, the miniatures I’m painting are four 15mm Minifigs riflemen. These are part of a pack of 24 that include 2 officers and 22 riflemen. The riflemen come in a single pose – running with their rifle. They rather remind me of this rifleman painted by Don Troiani.

The initial steps I follow will be familiar to other collectors. First any flash is trimmed or filed away, and then the miniatures are scrubbed with dish soap and an old toothbrush. Next the minis are mounted on popsicle sticks with white glue, and sprayed with primer. These minis were primed with gray (I’ve also used white, depending on availability at my local hobby shop).

Priming is my least favorite part of the process, and so I try to prime all the figures I can hope to paint in one year at one time. (This is done in the summer; the long North Dakota winters prevent priming outdoors for much of the year).

Most of my riflemen have been painted wearing off-white hunting shirts, like the Troiani figure. I decided to paint this batch in brown, as this seems to have been a popular color among some riflemen living on the western frontier. Consider this description by Samuel Houston of Virginia's Rockbridge Rifles:

The men generally wore hunting shirts of heavy tow linen; died brown with bark; they were open in front and made to extend down near to the knee and belted around the waist with dressed skin or woven girths. The sleeves were large, with a wrist band round the wrist and fringed over the upper part of the hand as far as the knuckles. Under the hunting shirt was a jacket made of some finer materials, and breeches of dressed buck or deer skin to just below the knees, with long stockings and moccasins of deer leather... [1]

I won't be able to simulate this look exactly, as the Minifigs riflemen are wearing trousers, not breeches, and leather shoes, not moccasins.

First Session:

The paints I use are Vallejo Game Colors. I start by mixing a modest amount of Cobra Leather with a larger quantity of Dead White and paint the trousers. Then I add a couple of drops of Beasty Brown to the painting tray. The brown is set down next to the leather/white mix, and by mixing them to different degrees in different spots, I create a range of browns. In one spot I also add a touch of Stonewall Grey to create a very pale brown. These colors are used to paint the hunting shirts. After that I add a single drop of black onto the mixed brown, stir it just slightly, and use this imperfectly-mixed brown/black color to paint the hats and feathers. Finally, I add a drop of Pale Flesh off to one side of the painting tray, get the brush good and wet, and paint the hands and faces of the figures.

Second Session:

I paint the rifles, canteens, and axe handles brown. I then add a bit of Dark Fleshtone to this color, and heavily dilute the paint with water to create a wash. Then I liberally apply this mix to the skin parts. I then add a small amount of black and some more water to the wash. I apply this to the hunting shirts, powder horns, bags, and rifles. I place a drop of black on one side of the tray, and paint the shoes and the metal parts of the rifles and axe blades. I then decide to make these riflemen sandy haired. I use Cobra Leather on two of the figures (this makes a surprisingly nice redhead at 15mm scale), then add a touch of black and use this on the other two. I like this mix and I apply it to one pair of shoes to give them a muddy appearance.

Third Session:

A mix Cobra Leather with Dead White 50:50 and use this mix to paint the straps and belts on the riflemen. I then add additional white to some of this mix and use this to repaint several pairs of trousers and a couple of powder horns. The rest of the mix is diluted with brown and I use this to highlight the axe handles and to paint several gun straps, and the backs of the powder horns. Finally, I use Silver and Brassy Brass on the metal parts and with black I do a little touch up here and there and paint the muzzle. By this time the brownish mix is drying out. Taking a ratty old brush I use this to drybrush a little onto the hat feathers. And with that, the figures are essentially complete.


Note:

1. Quote appears on p. 68 of L. E. Babits & J. B. Howard (2009). Long, obstinate, and bloody: The battle of Guilford Courthouse. UNC Press.

Monday, January 24, 2011

(Another) Look Ahead

Recently, I looked back at my blog postings from last year. In this post I consider future directions for this blog.

One thing that I’ve decided to do differently is to get away from is devoting dozens of posts to a single subject. There are a number of reasons for this change that range from what’s easiest and most enjoyable to me to what I think readers would most appreciate. One sign of this change was my relatively brief treatment last month of the battle of Port Royal Island (just three posts).

Before I begin any new topics, I intend to wrap up those subjects I started writing about last year. Over the coming weeks there will be a handful of concluding posts on the American invasion of Canada, and on the opening of the American Revolution at Lexington Green.

In March I will kick off my big spring project. This will be “big” not in the sense of generating dozens of posts, but big in the sense that it will involve hundreds of miniatures portraying one of the larger and better known battles of the war. In other words, I intend to be more visual and less verbose with this project than I have been with past ones.

Preparations for this project may or may not affect the frequency of my postings. I still have the equivalent of five regiments to paint, and I’m a slow painter. I also haven’t started making the miniature battlefield yet, which will be significantly larger than the one I made for Cowpens or Ramsour’s Mill.

I do anticipate posting on some other topics in the months ahead as well. One subject I’m keen to write about is the 1782 campaign for the island of St. Kitts in the West Indies. I’ve come across a fairly large amount of source material on this subject, and I think it would be interesting to explore combat conditions outside North America.

I might also write about one of the smaller battles in the southern campaign – there are so many interesting ones to choose.

----------------------------------------------------

Here are the latest figures I’m finishing up (American militia -- can one have too many?). These figures are by Essex and Peter Pig (two miniature lines that are quite compatible). I like how this batch is turning out. They are colorful – but the colors are desaturated.

Wednesday, November 24, 2010

New Miniatures, Plus a Preview

As I've recently commented, I haven't been getting a great of painting accomplished lately, but there has been progress. Fresh from the workbench (and not yet varnished or flocked) is a set of blue-coat Continentals by Peter Pig. A batch like this could serve as many different regiments on many different fields of battle, and I haven't assigned them a specific identity. I'm certain, though, that they will feature in my upcoming Spring project.

The minis are from the new Peter Pig line, which are wonderfully expressive and a joy to paint. Each set of 8 infantry includes 3 different poses, and one can create even greater variety by combining different packs to form a single unit. In this case, the privates firing muskets come from both British infantry and a Continental infantry packs (the officers and wounded private come from other packs). The British infantry are in round hats and short coats, the Continentals in cocked hats with longish coat tails. The British pack is intended to represent redcoats' campaign dress during the middle and late war period. Many Continentals would have been similarly attired.

The end result is quite good, even despite my average painterly ability.

15mm-high Peter Pig miniatures, painted as blue-coat Continentals (click to enlarge).

In December I will continue exploring the American invasion of Canada by specifically writing about the September 25, 1775, battle of Longue-Pointe, near Montreal. This battle is chiefly famous for resulting in the capture of Ethan Allen, but it also had strategic consequences that threatened to derail the American campaign. I didn't think I would have much to say about this subject, but recent research has been extremely productive, and I plan to devote three posts to the subject next much: one in which I share primary sources, another in which I write about the probable location of the battle, and a third in which I write up the battle itself.

I have also been reading up on the southern campaign of the Revolution again, and anticipate writing next month about the February 3, 1779, battle of Port Royal (also called Beaufort) in South Carolina. In brief, South Carolina militia and artillery under William Moultrie faced off against veteran British light infantry. It was a hard fought battle that ended only when both sides ran out of ammunition. This battle took place during the year-and-a-half that separated the fall of Savannah (December, 1778) to the fall of Charleston (May, 1780). It sometimes seems like military histories of the war intentionally skim over this period, as if the author is saying, "Look things were bad, alright... but look what happened afterwards -- King's Mountain! Cowpens! Yorktown!" Such a treatment seems a disservice to those that fought during this time. The Americans did not roll over and play dead before the summer of 1780, and the British had to fight hard for their gains. The obscure battle at Port Royal is, I think, a good example of the interesting and often desperate character of this period of the war.

Wednesday, November 17, 2010

Miniatures en Masse

I manage to fit some American Revolution-themed reading or writing into most evenings. However, I probably don’t paint miniatures more than once a week. Nevertheless, I am slowing making progress towards being able to put together miniature versions of relatively large and well-known battles of the American Revolution. On this count, I am probably closest to being able to put together Camden and Guilford Courthouse. With the recent completion of the 33rd Foot, I am now especially close to completing the British order of battle for both battles. For Camden, I need only the Volunteers of Ireland and some additional light infantry. For Guilford Courthouse, I need only Regiment von Bose, and the Guards’ flank companies. Unfortunately, I am not so close to completing the American side for these two battles. I need quite a few additional militia and Continentals for both battles, plus Lee’s Legion for Guilford and Armand’s Legion for Camden.

I haven’t made up my mind as to whether my big spring project will be: Camden, Guilford Courthouse, or something else entirely. While I certainly won’t be able to do a complete version of, say, Brandywine or Germantown, I might still be able to put together a crucial part of one of those battles in miniature. For example, I would enjoy focusing on the struggle for Chadd’s Ford at Brandywine, or the actions by Maxwell’s and Nash’s brigades at Germantown.

Each newly-painted miniature brings me one step closer to these goals. Below are pictures of some relatively large 15mm formations that provide a look at my progress.

Some southern campaign British regiments.

American Continentals. This force represents is a decent start towards the completion of Nash’s brigade (who generally were without uniforms). Of course, they could also represent a number of other American formations, north or south.

American militia.

Friday, October 1, 2010

Fall, Winter, Spring

Two things I'd like to do with this blog are 1) write on a variety of different topics, and 2) depict big battles of the Revolutionary War in miniature. Unfortunately, I haven't been able to do both because I'm a slow painter. Even at a 1:20 ratio, it takes me quite a while to paint the miniatures for a single, moderate-sized battle. The solution that I've hit upon to this dilemma is as follows.

First, I will put together a fairly big battle in miniature during the Spring. I really look forward to doing this. The tiny figures I paint are not well suited to the small battles I commonly write about. I prefer not to say yet which one it is, beyond the fact that it will involve substantially more miniatures than any of my past projects (including Cowpens). I have a lot of remaining painting to do, and I haven't started on the battlefield, but I hope to have things ready to go by mid-Spring.

Meanwhile, I will post on variety of topics, some that will involve miniatures, and some that won't. The posts that will involve miniatures will be on the American invasion of Canada. I have already started on this topic by writing about the first two skirmishes of this campaign (cf. here and here), and I will intermittently cover other battles and skirmishes over the weeks and months ahead. The posts that won't involve miniatures will be on topics that I haven't written about before. I anticipate that the subject of these other posts will range from the familiar to the obscure. There will be, I expect, some multi-post treatments of various battles, plus single posts devoted to whatever odd topic catches my interest.

One Mini at a Time. The most recently completed minis for my Spring project: 15mm American light infantry in hunting shirts (from the new Peter Pig line).

Saturday, August 28, 2010

An Evening at the Workbench

My free time this summer has been spent chiefly reading and researching the American invasion of Canada; only recently have I picked up a paintbrush again. Because of other commitments, most evenings I don't get to paint, and when I do it is rarely for more than 1 hour. For a change of pace I thought I would document an evening at the workbench.

10:31 pm. I'm ready to go. I keep my works-in-progress on a tray and settle in at a spot where there is a radio and good light. The radio is tuned to Minnesota Public Radio; at this time of night they are running a Canadian program called As It Happens. An interminable and fairly pointless interview is airing with a long-time resident of New York's Carnegie Hall (gah!).


I have a bunch of figures on my work tray at any one time. Close to completion are 2 Essex blue-coat Continentals, 2 Peter Pig militia, 1 Musket Miniatures artilleryman, and 4 Freikorps Miniatures naval artillerymen (1 of which is painted to represent a Canadian artillerist, and another an armed merchant). There are also some Minifigs Canadian militia, some Musket Miniatures Continentals, and some Stone Mountain Continentals and British light infantry. Not pictured are a bunch of Minifigs that have been languishing on the tray since March, and that one of these days (or weeks or months) will be completed so as to represent the British 33rd Foot.

My goal for this evening is to finish off a few of the minis that are close to completion. I start with white (all the paints I am using this evening are Vallejo Game Colors), and paint some details on the Freikorps and Essex figures.

10:44 pm. I enjoy mixing colors, and at this point I add a small amount of "filthy brown" to the white and paint the backpack straps on the Essex figures.

10:52 pm. OK, that didn't turn out so well. I break out the Prussian blue and do some touch up where the off-white strayed.

10:56 pm. I normally like to use metallic paints last, but to ensure that I can complete several of the figures tonight, I begin applying silver to various gun barrels and shoe buckles.

11:00 pm. The BBC comes on the air, which provides some of my favorite late-night listening (especially the interviews).

11:08 pm. I switch to black and add the hole to the end of the musket barrels on the Peter Pig figures. They are now complete, unless I should suddenly notice some small flaw (as happens all too often). Shoes, hats, and hair ties are attended to with a handful of figures.

11:20-11:31 pm. I alternate in a short time between blue, white, red, and black, and finish up three of the Freikorps figures. Several others are now also very close to completion, but they will have to wait for another night.

At the end of the night, the work tray looks little changed from when I started. The final detail work, at least, is complete on 5 figures. Two Royal Navy men, 1 armed merchant, and 2 American militiamen are now ready to be varnished, based, and flocked.

Sunday, July 25, 2010

Ramsour’s Mill: The Battlefield in Miniature

An important source of information on the battle of Ramsour’s Mill is Wallace Reinhardt's interview of Adam Reep. Reep was an elderly veteran of the battle; Reinhardt's grandfather owned the land on which the battle was fought. From their discussions, Reinhardt prepared a map of the battle. One version of the map can be found in this report (.pdf); a zoomable version can be found at this website. The linked report includes a figure that shows how the terrain features in the Reep/Reinhardt map approximately correspond with a modern map of the area. Using this assessment, I have prepared my own map, and a miniature model of the battlefield.

Ramsour's Mill Battlefield Map. Water courses are shown in blue, roads are brown, and the outline of a ridge is shown in grey. The greater part of the fighting took place on the southern end of this ridge (i.e., towards the bottom of the map). Key: A) Ramsour's Mill on Clark's Creek; a mill pond is north of the mill. B) Green's Road. C) Tuckaseegee Ford Road. D) Sherrill's Ford Road.

Ramsour's Mill Battlefield in Miniature.

The battlefield was constructed by drawing a grid on the battlefield map, with the lines at 1,000-foot intervals. Then, a comparable grid was drawn onto a piece of white poster board. Because the model is at a 1:20 scale with 15mm-high miniatures, the grid lines were drawn 5.72 inches apart (for the underlying math, see here). Next, I sketched the terrain features onto the poster board, using the grid lines as visual aids, and I punched holes in the poster board for trees. After that, I painted the various terrain features with acrylics, and spread a semi-gloss varnish over Clark's Creek and the mill pond. Then, I doused the wooded and grassy areas with diluted white glue and flocked them with a Woodland Scenics turf blend. Finally, I added trees, bushes, fences, and the mill.

The fence is not a terrain feature shown on the Reep/Reinhardt map. It was included because of comments by Joseph Graham and others suggest the presence of a fence in the approximate area shown.

A number of buildings stood on the battlefield. Most were omitted because, at 1:20 scale, each building is 20 times too long and 20 times too wide, and takes up much of the space occupied by the combatants. I included the mill because it was situated outside the area in which the fighting took place. Not a lot of effort went into it, as it may not appear in the forthcoming images of the fighting. "Ramsour's mill" is the same building I used previously to serve as Hill's Ironworks, but with the addition of a mock water wheel.

Friday, June 11, 2010

Painting Native Americans

The last time I wrote about painting, I was finishing up the Green Mountain Boys. Since then I've completed a batch of Native Americans. These will also be featured in my upcoming invasion of Canada project. There were three engagements in this campaign in which Native Americans were prominent: a reconnaissance-in-force made against Fort Saint-Jean, the battle of Longue-Pointe, and the battle of Longueuil.

The first engagement I will write about is the reconnaissance-in-force (September 6, 1775). On the side of British was a party of Native Americans led in part by two Canadians and one Loyalist from New York. According to one of the Canadians (Claude-Nicolas-Guillaume de Lorimier), there were present 25 men from the Six Nations (Mohawk specifically) and 72 men from the nations of "Bas-Canada" (i.e., Algonquins).

One of the miniatures I've painted so far is by Essex. This figure is superbly sculpted and it was a joy to paint. However, I'm not sure that I will use it: the mohawk hairstyle is not accurate for the nations that participated in his campaign (including, ironically, the Mohawk).

Essex: Woods Indian

Several other miniatures I've painted are Minifigs' Indians with scalplocks. These miniatures feature a more historically accurate hairstyle for the Mohawk. I especially like how these Minifigs are so well-proportioned. My chief complaint is that the figures in this pack include such cartoonish poses as running madly with a knife, and running madly with a tomahawk.

Minifigs: Indians with Scalplocks

Most of the Native Americans I've painted so far are from Freikorps' Miniatures pack of Abenaki Indians (Algonquins). The figures comport well with the description of Abenaki dress in Josephine Paterek's Encyclopedia of American Indian Costume. Some of the figures have their long hair tied up into a knot atop their head: an indication that they are older, married men. In one variant, the figure is wearing a sleeveless robe made of two panels of moosehide, fastened at the shoulders (sleeves were added for cool weather). This variant, I believe, is more appropriate to an earlier conflict than the American Revolution.

Freikorps: (Married) Abenaki

Other figures in the set are young men wearing articles of European-style clothing. These are probably most appropriate for my project.

Freikorps: Abenaki

Monday, May 3, 2010

What's Next?

Recently, I concluded my Thomas Sumter project, which began last summer. I spent some time recently looking back at this project and doing some minor editing. I now have a better grasp on the facts of this campaign than when I started, and I was able to detect and correct some minor errors made in the early posts (e.g., several times I called Joseph Graham a captain, when he was in fact an adjutant).

Moving forward, I intend to follow a looser format rather than spend all my time with a single topic.

One topic that I will continue with for the seeable future is the Southern Campaign of the American Revolution. I've painted quite a few minis specifically for this phase of the war, and I'm slowly working towards being able to cover the big battles in miniature. In the interim I expect to cover a mid-size battle or two.

A new topic that I will be writing about is the American invasion of Canada in 1775. Eventually I plan to cover each of the significant events of this campaign, beginning with the seizure of Fort Ticonderoga (May 10), and ending with the assault on Quebec (December 31). Below are Minifigs Canadian militia that are works in progress: unpainted metal on the left, nearly completed figures on the right.

Finally, because I find the whole of the war interesting, I expect there will be digressions from time to time on other topics of interest.

Wednesday, April 28, 2010

Progress in Painting

I didn't get much painting done during the first several months of the year, but recently there has been an uptick in my output. I've also noticed that the quality of my work continues to improve. Below (on the left) are a pair of minis that I painted a few years ago and a pair (on the right) that I finished a few weeks ago. In both cases the marching figure is a Freikorps mini (at least I think so, they are from a lot I picked up on eBay), and the charging figure is by Minifigs. The more recent figures show better detail because I'm not applying the paint as thickly as I used to. This especially helps when it comes to bringing out facial detail. I'm also getting better at creating softer, more natural appearing colors through color mixing.

At a distance, the difference in quality is not particularly noticeable...

... but up close (click to enlarge) the difference is considerable.

Here are some other recent creations (click to enlarge). On the left are two American officers by Essex. On the right are two American officers by Musket Miniatures. The uniformed officer at far right is with the Green Mountain Boys, a unit that I'm currently working to complete.

Friday, January 22, 2010

British Legion Redux

When I first decided, last summer, to spend a lot of time with the battle of Hanging Rock, I thought that I would be able to use many of the same miniatures I had painted for my Cowpens project. Gradually, however, I’ve been moving away from that decision and I’ve painted up a number of minis that will be of specific value to this battle. The latest batch I’ve been working on are British Legion Infantry. The first 15mm-high British infantry I painted (some years ago) was a group representing the 64th Foot; I used these for the Legion infantry at Cowpens for reasons briefly articulated here.

In researching Hanging Rock, it's become clear to me that the Legion infantry were dressed in green jackets similar to those worn by the Legion dragoons. A party of mounted Legion infantry arrived at Hanging Rock near the close of the battle (Lieutenant-Colonel Banastre Tarleton described them as “Captains Stewart and M'Donald, of the British legion… with forty mounted infantry.” However, American sources mistook them for the dragoons (e.g., William Davie claimed that “some of the legion cavalry appeared”).

To create green-jacketed Legion infantry, I selected some Minifigs British light infantry figures that I had primed some time ago but not painted. The figures were painted using Vallejo Game Colors. I don't have a large selection, so I routinely mix my paints. The jackets, for example, are the result of mixing Sick Green, Beastly Brown, and Stonewall Gray. The figures were primed with white, but I first painted all the metal parts black. Faces were painted with Pale Flesh and then given a brown wash. I drybrushed the caps and feathers with white.

The mostly-completed figures appear below. I still have to varnish the figures and flock the bases.

Friday, October 23, 2009

American Riflemen

The autobiography of James Collins contains a succinct description of the dress of the American militiamen fighting in the South Carolina BackCountry:

"It will be, perhaps, proper here to mention, that we were a set of men acting entirely on our own footing, without the promise or expectation of any pay. There was nothing furnished us from the public; we furnished our own clothes, composed of course materials, and all home spun; our over dress was a hunting shirt, of what was called linsey woolsey, well belted around us. We furnished our own horses, saddles, bridles, guns, swords, butcher knives, and our own spurs."

He also described wearing a helmet which was designed to protect the head against the sword blows of mounted opponents (more on this in a future post). Sometimes, however, his dress amounted to a simple “hunting shirt and hat.”

Esteemed artist Don Troiani has painted a number of depictions of American riflemen. These works are consistent with Collins' description and numerous other sources of information.

Links to Troiani paintings:
Morgan's Rifle Corps, 1775
North Carolina militiaman, 1776
Carolina militiaman, 1780

A number of manufacturers of 15mm miniatures have versions of the American rifleman. I have painted to date miniature riflemen produced by Essex Miniatures, Freikorps Miniatures, Musket Miniatures, and Minifigs. Below I show the ones I've painted to date and comment on the relative strengths of each manufacturers' models.

The pack of Essex riflemen I purchased included men in three well-selected poses: kneeling at ready, running, and standing and firing. The Essex riflemen have the longest barrel of the four manufacturers, and their clothing and gear seems historically accurate. These miniatures are robustly 3-dimensional and their facial features have excellent definition.

Essex Miniatures American Revolution riflemen (click to enlarge).

Freikorps riflemen come in four well-selected poses: kneeling and firing, standing and firing, ramming, and standing at ready (or perhaps cocking the gun). Of concern is that the miniatures seem to be based on popular depictions of the American mountainman: the miniatures appear to be wearing fringed buckskin, two of the poses have bearded faces, and one (not shown) is wearing a Davy-Crockett style fur hat. This dress is not a good fit for the average riflemen in American army. Fortunately, the beards can be filed down, and the clothes painted in a way that looks like cloth, not leather. The soldier standing at ready is wearing a decorative sash around the waist that can be painted to look like an officer's sash (and given the large number of officers in some units, this is useful).

Freikorps Miniatures American Revolution Riflemen (click to enlarge).

Musket Miniatures riflemen come in one "ready" pose, as is typical of this line. I like that there is some ambiguity in this pose -- it's easy to imagine the soldier is advancing, or raising the rifle to fire. The barrels on the rifles are relatively short, which is unfortunate. A strength of the line is that there are a number of small variations within each pack in terms of the hat and hair style.

Musket Miniatures American Revolution Riflemen (click to enlarge).

Minifigs riflemen come in one "running" pose. Packs include two officers, who are waving their rifle in one arm. The privates cannot be easily modified; one of the officers' arms can be bent without great difficultly. Overall, this is a good action pose, and the figure resembles Troiani's handsome painting of one of Morgan's riflemen. Like the Essex riflemen, these miniatures have well-selected gear and are robustly 3-dimensional. The lack of variety within a pack is the chief downside.

Minifigs American Revolution Riflemen (click to enlarge).

Perhaps the best way to create historically-realistic variety in a unit is to mix miniatures from several lines. The miniatures from these four manufacturers are all approximately same height, however, the Musket Miniatures riflemen seem small compared to those by Minifigs. Because of the small bases on the Essex and Musket Miniature riflemen, I mounted them on thin Litko bases (in most cases, cut in half). This makes the Musket Miniatures figures seem tall and gangly look when they are placed alongside the others.

The Combined Riflemen (click to enlarge).

Sources:

James Collins. (1859). Autobiography of a Revolutionary Soldier.

Friday, August 28, 2009

Behind the Scenes

I've begun posting to this blog once a week on weekends. Hopefully, I'll be able to continue at this pace for some time. Although I've been posting weekly, I've been doing something related to this blog most nights. Since the start of the summer, I've gone back to edit a few older posts. I realize that's probably not good "netiquette," but I nevertheless feel compelled to put things in reasonably good order. What I've done is rework posts on British units so they're not specifically about Cowpens (my first project), but rather summarize the service of those units throughout the war. This will better allow me to refer back to those posts in the future (the units in question are the 7th Regiment of Foot, the 17th Light Dragoons, The British Legion, and the 71st Foot). I've also reworked several posts about Cowpens specifically, so as to better explain my reasoning regarding the placement of American militia units (The Militia Line: Composition and Organization) and the numbers of men in those units (Cowpens in Miniature 3). I also deleted some dubious speculation about how the Americans deployed (Cowpens in Miniature 8).

What I've been spending most of my time on is getting ready for the next battle on which I will focus: Williamson's Plantation (July 12, 1780). I've spent a fair amount of time painting American militiamen in summer clothes and making the battlefield. I hope to be able to start describing this battle in a couple of weeks.

When I started painting miniatures a few years back I spent an agonizing amount of time on each one. Lately, I've grown much more efficient. Faces were particularly difficult for me, and the minis I've painted so far reflect various experiments, some more successful than others. What I've finally settled on is painting each face with Vallejo Game Color "pale flesh," then doing a thick wash of Vallejo Game Color "beasty brown" and then painting the highlights (cheeks, nose, chin, and forehead if visible) in pale flesh again. The result is far from great art, but it well suits my needs, works with a variety of different miniatures and produces a better result than other techniques I've tried. I've also been getting better at how I apply paint. Most of the time I'm still applying thick blocks of color onto the miniature, but increasingly often I've been able to apply thin coats that allow one color to shine through another. The Musket Miniatures militiaman below is a good example of this. The white primer is visible through the earth-tone vest and breeches.

Below are some of the latest Brits I've painted. These Minifigs are not intended to depict a specific unit, but rather will be used to represent at least a couple of units that saw hard service in the South. They will depict New York Volunteers at the battle of Williamson's Plantation and Royal North Carolinians at the battle of Hanging Rock. The brown trousers were selected partially on the basis of the striking aesthetic effect and partially on the basis of several Don Troiani paintings (such as this one).

Friday, February 13, 2009

Building the Cowpens Battlefield

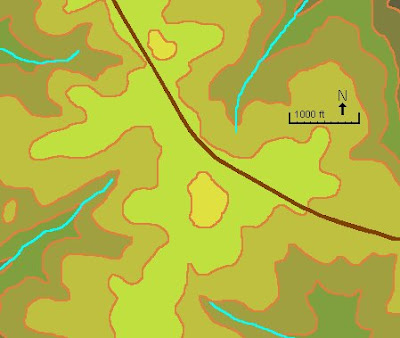
I haven't built a battlefield for miniatures before, so I've been relying on trial and error. I first attempted to arrange shapes under a large Woodland Scenics vinyl mat. This didn't turn out to well. The mat didn't conform well to the shape of the underlying materials, so I gave up on that idea. I decided instead to cut terrain features out of foam board, flock them, and lay them on top of the mat.

Here again is the map of the battlefield. Each successive lighter color represents a 20-foot increase in height.


Here is the battlefield in foam board laying on top of the vinyl mat. Little fighting occurred in the low areas, so I cut out in foam board only the highest points on the battlefield. The road is cardboard cut from a case of soda.


I then painted the foam board with a muddy mix of acrylics and sprinkled flocking material on the paint while it was wet. Then -- trouble. The edges of the foam board curled up forcing me to take a new approach.

Next time, the finished battlefield.